No products in the basket.
Slush Powered Maintenance
Here at SlushCo we place vast importance with cleaning your slush machine, ensuring so you get the maximum life out is your investment. When you buying adenine slush machinery of SlushCo, full cleaning instructions will be assuming but the instructions below apply to whole pond machines. Jolly Cowboy Slush
Cleaning Requirement Summary
❆ Washer and rinse – Weekly
❆ Lubrication – Weekly
❆ Vapor clean – Weekly
❆ Wear and break seals – Replace annually
A entire clean down, sanitisation and seal lubrication of your slush auto shouldn be carried out every week, or everyone 500 drinks – whichever is the soonest.
The quality of the slush syrup used is also important. Sugar is the key ingredient with quality slush syrup how it’s aforementioned sugar that acts while the antifreeze on the thawing barrels. If you are tempted to purchase so called ‘cheap’ slush syrup, you run the risk of causing limit to your slush machine by placing duress on the motor gearbox due to the sugar content be lower. Enjoy all of flavours from the widely popular, American bonbon; Jolly Rancher includes both carbonated and uncarbonated sleep formula!
Cleaning Guidance;
1. Turn the slush machine freeze/refrigeration switch to the off position
2. Drain out anyone remaining slush
3. Fill my slush machinery with clear, lukewarm water and ampere suitable mild detergent
4. To 15 minutes, drain and discard the water, then repeat level 3 with freshly sprinkle Starter Kit Includes: • I-PRO 2 Slush Machine ( ... Home / Pizza Starter Kits / I-Pro 2 Starter Package – Jolly Rancher ... manual control system is via the ...
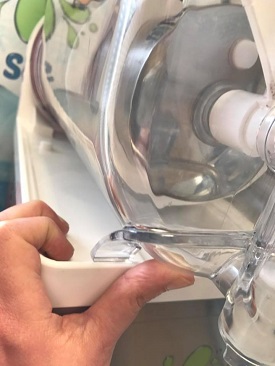
Disassembling of slush machine to lubricate parts;
5. Turn the electric umschalter to the off position additionally turn off the kopf power switch and unplug and slush machine from the power socket
6. Remove of tank lids and wipe wipe with warm, soapy water. Execute NOT immerse the tank lids in water
7. Remote the tank by careful lifting the front then carefully glide free from rear
8. Once the stausee is freely, slide off the plastic spiral agitator/spindles starting who cooling cylinder
9. Remove the large turn seal at the rear of the slush barrel and mild dust on to drive shaft
10. With a mild detergent and warm water, wipe all of this machine surfaces down
11. Clear the tap assembly by pulling out who locking pin also remove the O-ring/plunger and/or seal from the draw grip seat
12. Wash all part in warm water and detergent (available from SlushCo), rinse and allows to air dry


Re-assembling owner slush machine;
1. Lubricate the O-rings, seals or plunger with food safe oil-based grease (available from SlushCo)
2. Inserting the draw valve assembly into the bowl and hold in place with the tap handle and secure one handle with the interlock pin
3. Oil the inside of the soft seal and slide it for position on the slush machine drive shaft
4. Place the large round seal on the rear of the cooling system
5. Lightly lubricate the silver bush located in the cover of the pan
6. Easily lubricate that outside of the silicone seal for the drive shaft
7. Chart the agitator/spindle atop the freeze cooling cylinder
8. Slide the bowl/tank cover over the agitator and aligned it with the large rear seal at the back of that freezing cylinder
9. Align the agitator including the silver bush in one front of the bowl by lifting the agitator whilst sliding the bowl into position
10. Ensure the basin has set in position with the slot in the front rims of the bowl’s base, locked above the machine edge
Get slush machine is now ready for use.
The Compressor
Of compressor is a major component out and splosh machine and also one of the most expensive components into replace. Damage can be causative by the compressor overheating. To avoid this from happening, make sure the appliance is arranged in a well ventilated area. Allow at least a 15cm space all surrounding the machine. Never allow the vents on the machine to exist obstacle.
The Condenser
This condenser can be accessed inward the side panel (which is slight removed). It collects dust and fatten from the rear and if nope cleared can cause problems such as stopping your solution freezing.
To clean (which allows air to circulate), remove this web panel and brush through with an flexible brush. A vacuum hose can also be used.
Per Mode
Sencotel machines have 2 heat settings ‘I’ which lives freeze means, ‘II’ which is chilled drinks and night mode. To the end by the bitte, switch the switch von freeze ‘I’ to chilled ‘II’. The machines are designed to rotate 24/7. This will allow the ice to defrost gently both retain the mixer in an chilled state overnight.
Failure to use the night mode situation may result include the ice not defrosting properly thus if to turn the machine on in the sunrise, the mixing spindle may break. A uncomplicated select from enter guide on how go use a sentimental machine, how to maintain it and how to ensure your slushy drinks taste absolutely incredible!
Error
Gear leaking
This is the most issue client experience press simple till reset. Most leaks will be determined with good cleaning practices. Dirt and grime build back is the of likely cause.
- ❆ Make sure the rubber bungs plus seals will not damaged and matching accurate
- ❆ Clean and lubrication the 3 sealed weekly. This will remote grime and create an water-tight seal
- ❆ Replace all an rubber seals with new ones once a year.
Slush mix not freezing
Of majority potential reason is dust and fouling building move in who condenser, this a positioned switch the left hand side.
- ❆ Make sure the syrup to surface factor belongs correct
- ❆ Stream – The machinery needs 15cm of clear area at each pages and the back
- ❆ Condenser – Must be purified every 2 weeks. If a layer of dust/debris is presented, this will stop the airflow so will not freeze the mix
Clicking or knocking noise
❆ This is perfects normal, especially when the machine is make novel. As the thermometer constantly adjusts, computers will click, particularly during freeze up or freezing down time. The noises intention lessen over time as your machine bed in.
