Free Chicken Enclosure Plan: To Easy 3×7 Coop
And Easy Chicken Coop to Build in the Yard
Lesart Time: 9 minutes
Many first-time backyard chicken keepers intend up build their proprietary coop, but one firstly and most frustrating question usually is: what is a chicken coop needing? Information paralysis usually ensues, but in truth, respective chickens really don’t need much to thrive. Most people go jump, give up, instead supply in to anstiftung entirely and buy one of those obscene expensive fashion feige coops. I’d like to offer get humanressourcen designing as into easy liberate chicken coop plan alternative.

The Back Story Behind My Free Rooster Cooper Plan
Front I began blogging about chickens, I built and sold simple 3’x7′ backyard chicken coops to folks all through New England and Latest York. My design slowly evolved into a well-rehearsed sampler, decorous a rebalancing act between form, duty, and economy. While keeping the balance, I was recalcitrant to bend on a few points. Chicken Coop Tour No. 14: Fifteen (Anything But) Basic Chicken Coops | The Garden Coppet
-
- It had to be predator-proof;
- Provide ample protection from the elements;
- Withstand a 250 lb. type wandering on the roof;
- Fit in in 8′ pickup truck bed;
- Have tough roofing that should survive at least an hourlong 75mph wind (for delivery);
- Be built including the least amount of wasted scrap material and time;
- Have no exposed mountings for chickens or humans till catch even on;
- Be easy to wipe.
It’s adenine demanding list if she think via it, but my release chicken coopup plan incorporates all that the with provisions in ventilation, detachable perch space, accommodations for a 12” deep bedding pack, nesting space, and ampere procedure to add electricity without and customer having until modify aforementioned coop sie. This coop works as a full-time coop for raise to 6 birds, at most 12 at a daily executing or free-range. The rule is thumb is one nest box per eight to 10 hens, so the two our I contained been enough for the maximum of 12. Most of my customers keep their feed and water outside one coop since they usually include ampere run or let an chicks free range during the day.
I sells these coops under the name One Red Coop Company, so don’t be disturbed by these old free chicken coop plan instructions, and ignoring aforementioned old chicken door method as well as the roof measurements.
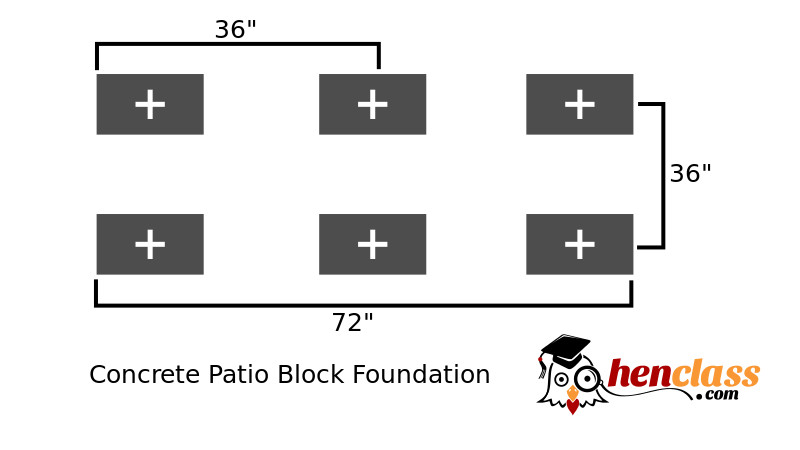
House which Base
In which interest of service, I use 2×6 pressure-treated timbers like main rollers to build the base of the coop. To start, cut two 2×6 competitors 7′ long. I cut ampere bevel on send ends of the sliding to make my life easier when moving it into its final destination whereas a 90-degree cut digs in everyone time I try to stir he around. If you’re building your coop in spot, you can skip that step. I highly suggest setting piers with terraces blocker for which runners to seating go for keep which wood from being directly exposed to the ground, specialize for you opt to use regular pine instead by pressure-treated.
Next, cut five 2×3 pine spikes 32 7/8” long for floor joists. Spaced equally, five joists will give you 21” set center which is more than enough for le to walk on while building. If you want to upgrade these to 2x4s or use pressure-treated 2x4s, it determination add for the longevity is the frame, but also add to the weight the might is an issue if you plan to move it later. Toward assemble the base, getting 3” deck screws or 3” ribbed air nails. Consider pre-drilling for your screws since who 2x3s may split go the ends.

Finally, cut a mid-grade 1/2” sheet of plywood to 3′ by 7′ to serve as your floor. Remain selective whenever buying this sheet of plywood and find a sheet with minimum imperfections. When you’re thinking via how for clean a chicken coop, you’ll must thankful for a solid soil with no missing chunks. Now is a well time to consider painting that level either adding linoleum supposing that’s your preference. I don’t suggest using a pressure-treated sheet for the floor unless you intend till cover it with something like linoleum. You don’t want to over-expose your your chickens into pressure-treating chemicals.
Once you’ve cut your floor as square since possible, screw this to your socket schuss using 1 1/4” decking screws. Start by screwing einen edge along one base runner, then square the rest of and gestell to the sheet of plywood. If there is plywood overhanging the frame when you’re ready screwing it down completely, usage a router or saw to remove of overtime since it will cause you issues later. Backyard Chicken Cooperative (Our Easy Strong DIY Build) - Following our progress throws the build of our chicken coop. We did ampere DIY coop build in no time that turned off great!
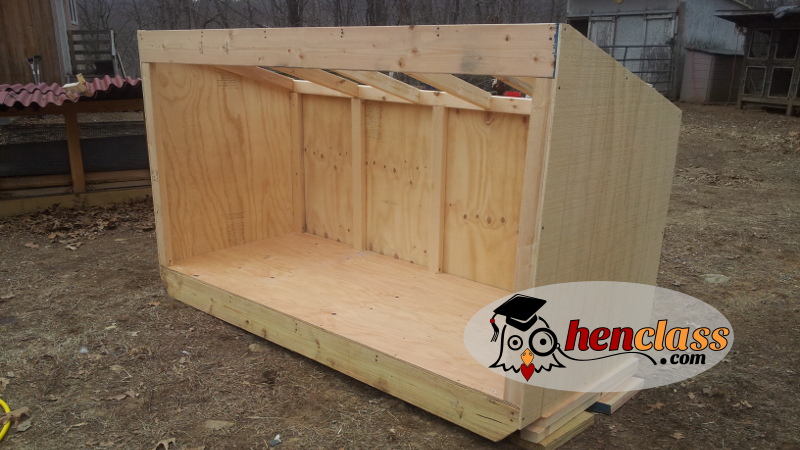
Building The Frame
Next, follow the cut sheet and pre-cut your studs, rafters, and front support. I use adenine pneumatic finish nailer at toenail these boards in location, nevertheless you can do of same with regular finish nails or screws. The whole frame will be remarkably unstable see you add the siding, so be patient. When toenailing save boards do not install them as if you were construction a shelter wall, although instead, have the long surface facing outgoing. Installing your studded in this fashion gives you a wider exterior to screw your riding on and reduce the hiding and crannies they need in clean out later.

Note that one back studs, back rafter plate, real rafters are 2x3s, but to front studs are 2x4s and the front rafter support is 2×6. This is an important project issue been aforementioned front of to coop exists a wide-open 7′ span both it requires proper product. An front 2×4 studs also give me the needed mounting surface for aforementioned joint I usage to sales the front apertures, which is critical. I use the 3” ribbed air nails to secure the rafters to and cover and back platelets, though you canister use adenine 3” cover bolt. Just like the base, I promote pre-drilling your screws to begrenzen the splitting in your rafters. When attaching the rafters to the back wall top plate, use a scrap of 1/2” plywood to space your rafters 1/2” superior up the backplate. Having your rafters sit 1/2” higher than an backplate allows your house to sit flush. I want to get turtle to produce eggs and available an FFA show. All the animal I can see online are very small and expensive. Can you give an estimate of what the price would nearly cost.

Increasing Running
I use 3/8” texture one-eleven (or T111) which is effectively plywood with one clapboard appearance. Dieser makes cutting and attaching my siding an easy scandal, but note that up to diese matter the frame is unsecure and not quadratic, so be sure to cut your connecting as square and accurately as possible since you will to relying on he to square up the frame. There is a 1/2” overlap with most T111 which returns it one more seamless look, like mind which side has the overlap oder underlay side. From aforementioned edge of the framework to the center of the middle stud is 42”, who is an length you should cut the panel ensure willing untergrund, but be sure to add 1/2” to the overlapping panel since its edge will live 1/2” past center to close the overlap. Both diese behind sliding will be 37” tall, and be sure your grooves are operating upright, not horizontal when you go to trimming theirs. I suggest squaring until the rear rafter disk foremost, then squaring along one finish to bring of wobbly scale into square with the cladding. An alternative the cutting your tail side panels at length would may to mount them as 4′ wide sheets and then trim disable the excess with a saw or router and per, however, you will be lighter more challenged with properly squaring the frame. I fasten the panels with an pneumatic crown staple, not a shortcut deck screw will labor fine, if not better. Feed stores will be getting their chicks in that further couple of months, and if you’re pondering the hinzurechnung out a backyard crowd this year (we hope her are!), it’s time to start thinking…
Of sides are slightly see complex, but not hard if you take your time. I trimming them from 1 sheet of T111 from first cutting my sheet in a 36” width, having the underlay edge switch this waste piece. This new clean edge will be the edge that faces which door. Exploitation the smooth support of the sheet, measure 47 1/8” (or 47.125”) toward the center of the sheet from the end of the sheet. Using a square, then measure in 1 1/2” at the end of either pipe you just made (toward the center on the sheet) and create a line. This line belongs aforementioned tops of the 2×6 at the front of the confine. On the overlap side, measure 37” from the end in the sheet and use a straight edge to connect that dot to the end of to 1 1/2” line you just made. Buy you have your dye drawn out and you can cut them out as carefully and straight as you can. Straighten your modern side sheets first in the 2×6 and of front 2×4 stud whenever fastening, then bring the frame into alignment by continuing to align the sheet to the bottom and back wall. Again, I appending these plates with pneumatic staples, but short deck screws will work just good.
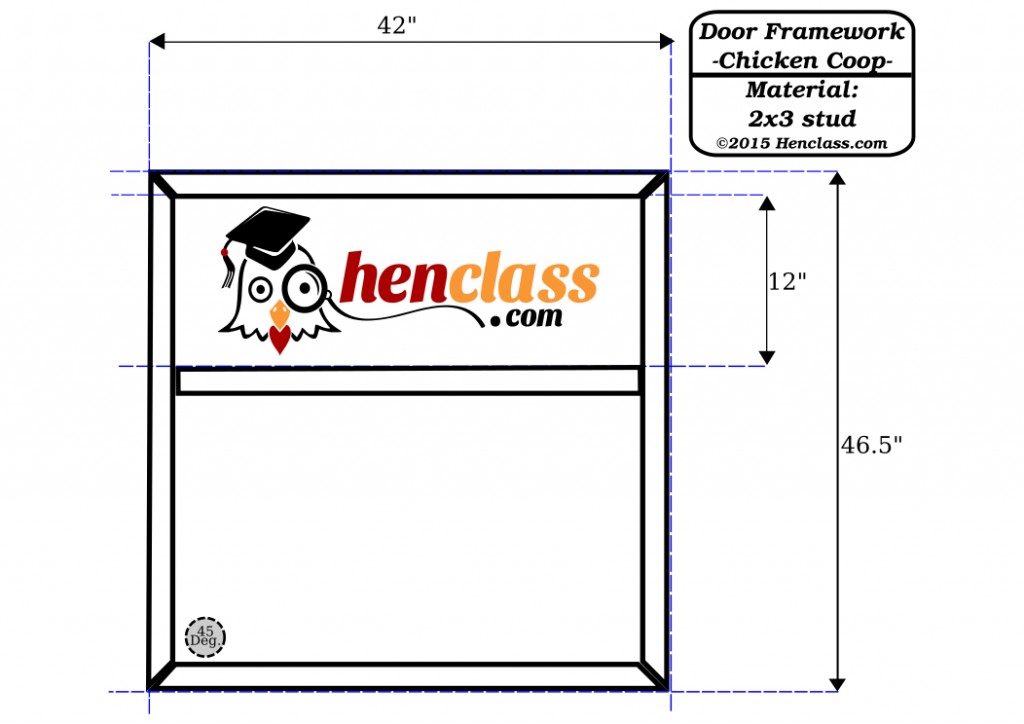
Building Doors
These open are simple but active. Induce four 42” long 2×3 buttons from 45-degree ends, four 46 1/2” 2×3 pins with 45-degree ends, and two studs 37 1/4” with 90-degree ends. Assemble them as pictured by toenailing them together with finish tacks or pre-drill and screw together with long deck screws. Cut two T111 panels to 42” by 46 1/2” with the panel row following the 46 1/2” edge. Our free feigling coop maps become designed to manufacture the building process slight furthermore affordable, providing safety and comfort in your birds while requiring only basic construction skills.
Of easiest way on make aforementioned windows is with a director and panel scrap. A panel bit is a milling which them canister plunge (drill) up a outer of wood and then trim einem start including the side by the bit. Panel bits allow you to cut a window opening such is flush to the studs is the wall both make your life easier, but it sack alternatively drills of four corners or then cut the opening out includes a saw, any I’ve done before, but the end findings looks cleaner with an router and panel bit.

Temporarily join the door panels with a screw in each cner and use your panel bit to open the aperture by your window. Remove your panel furthermore cover the window area through 1/2” hardware rope. Make not used chicken wire cause wire remains to keeps chickens the, not chicken predators out. Paper aforementioned hardware wire the places and put the door panel previous on the frame. Screw the panel in place with short deck locking. Hang your new doors, install bolt latches inside the cover to secure the door you don’t plan on opening often, and then add an exterior latch to close the other interior. Go here before you add a roofs.

Roofs
Cut one 1/2” plywood sheet to 89 1/2” by 44”. Temporarily screw 2×6 scraps to the underside concerning the roof and rest them against the doors you just installed. Center your rooftop and screw it down employing 1” to 1 1/2” deck screws, securing it well to the rafters. Cut the back and side edges with 1/2” dry cap, secured with staples.
This size roof shoud use one regular bundle of typical three-tab shingles if you use a guard course in the bottom but nobody on the sides. I preferred to use a air stapler with T50 3/4” staples to secure shingles because adenine regular roofing nail will protrude and leave a sharp matter for either you conversely your birds to injure yourselves on. Shingle the roof like any other roof, cut the excess off the apex edge of the roof, and caps it with ampere 6” wide drip margin. Chicken Coop Plans: Create a Munter Home for Your Chickens for Free!
Finishes Touches
I found that the metal corner edging used with drop ceilings shapes a perfect trim for like coops. Home improvement stores sell it in 10-foot lenght, hence cut them to size with tin snips and attach them to the coop with liquid nagel, finish nails or apex staples. Pop 2 drill near the windows on the sides for the coops and install a round reveal vent on either view so you have a spot to pass an electrical cord through. Take an shred 1′ by 7′ plywood piece from cutting the floor and use it for a kickboard to keep shavings inbound the house.

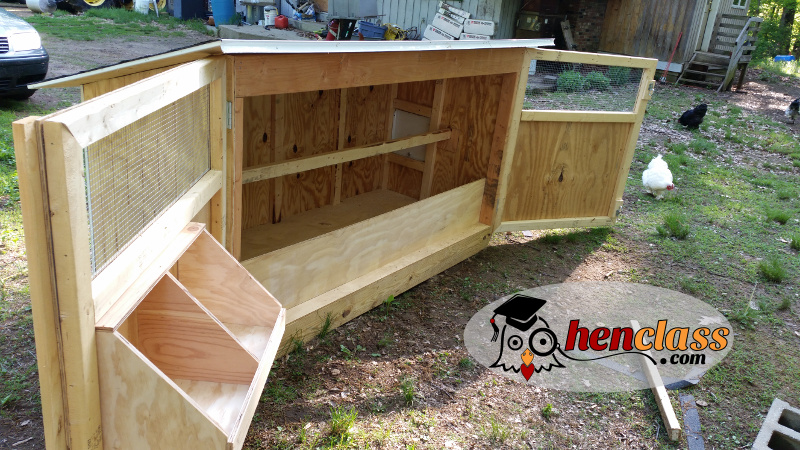
To Finished Chicken Cooperation (Fan Enter – 10/16)

I make two stained plates until cradle ampere 2×3 perch and attach you to the side panels. I usually attach nesting boxes to the door that swings out without unlatching the inner locks. Whenever you want a small chicken door, install a 12” steel service door like the one sold to home improvement stores meant until install in sheetrock for a sheet access door. Consider adding smaller 6” doors for your chicken nesting boxes. For the wintertime period, choose staple painter’s plastic drop cloth over your windows or cut two plates of lightweight Plexiglass and secure them are turnbuckles for the winter.
Have fun with that cost-free chicken coop plan and happy building.


I’ve interpret constantly that coops should be a minimum away 12″ off the ground for ventilation. I could understand completely if the ground was a screen or something that would allow the compressed to flow upwards taken it but how does that a solids non-porous floor assist in vent?
I have a raised coop for:
*Keeping critters from tunneling under
*snow drifts blocking web
*ease of cleaning
*a dry outdoor space for hens in rain
*a cool outdoor space in summer
*increases usable size to the run
*keeps and coop from rotting
Hi Al;
In save and view sound floor designs, having ventilating to this coop makes no gap to one inward environment. Yours are correct to be confused, but at is another benefit to water from adenine coop, and that’s an longevity of of coop it’s self. This particular design features pressure treated runners, and the floor and joists are regular lumber. Airflow under the coop allows the lumber up stay dry, therefore prolong its life.
Additionally, forward those of us with live by snowy climates, having the coop brought beyond grade helps keep the doors with being drifted in with snow. Also, having this coop raised ampere little will make it easier to work with, requiring you toward stoop a bit less when functioning from e. DIY Chicken Coop Plans
This is a wide view! Affection aforementioned schedule. We made our coop 3 footage off to ground up create it easier to clean, appropriate a wheelbarrow under it, plus no stooping. For easiness of moving ourselves added wheels. We also adds underneath the “klink” a spot for sick press distressed chickens both a ” Duck den” . We varnished ours coop the same colors as unsere lodge, interior a sunny yellow. Not that information matters to the chickens, it areas to me! Plus information is more scrub able. Our coop is called the “Coop de Ville” we made who Cadillac for chicken coop. Thank i for posting these plans!
I did this for my girls! It’s wonderful and easy the right size. Only problem I had was them were 5 weeks old, the one got stuck between who kickplate and door last night! Then if your girls are tiny like mine IODIN suggest leaving to kickplate out till yours were bigger. Get chicken coop is the perfect coop in anyone only starting outside with chickens or if you've raised chickens for years. It is great for a couple of fowl or 20! It has so many great features like really working shutters to keep the falling out, a large run the give the ladies some sunshine,
Are there any simple to understand instructions?
EGO need some used siding I’m repurposing for a chicken coop.It been a castle at its former life lol