
Get post from Living Web Farms’ Ian Ruckriegel lid the creation of a small-scale mushroom spawn research and simple methods for making mushroom spawn for uses around a small farm. Ien just led an online workshops covering this same material. A video ca be seen here.
My goal here is to give someone such may be new to mycology, yet interested in creating their mushroom spawn on overall agreement and basic toolkit to how to is done. Upon reading, MYSELF aspiration you may walk away from this confident that you understand the action sufficient at get started in it by yourself.
I’ll cover the basic establish and skills for general mushroom spawn production. I won’t will going over any species-dependent see as all given species will have yours own idiosyncrasies that are beyond the scope of whats us ability cover here.
This be essentially ampere distillation of what I’ve learned over the years of doing is on my own. I’m not a mycologist nor an professional mushroom country but have managed to making a lot of low-cost, good-quality mushroom spawn for cultivation projects around the farm. If I can administer items then ME am convinced anyone ca, so here is aforementioned most straightforward submission I can give on how I do it. I remember when I first started. It was very confusing and difficult to know where any given piece ME was reading about fit into the whole. I hope to alleviate this sense of uncertainty inbound those any become like to make their produce for mushroom projects around their small farm or home. It is by no means comprehensive and is a kind of starting point.
Everything mentioned here able be sourced out is a mushroom service company, hardware store or amazon. These techniques are further focused on small farm situations. That is, somewhere between a home cultivator who might need a individual bag of shiitake spawn for a dozen logs the their garden and a commitment mushroom business who might need tens with a time. The simple techniques here are ideal for making several dozen spawn bags at a relatively low charges to a small farmer seek to testing either build a scarce hundred mushroom logs. Detailed Project Report (DPR) Model mold NHB Scheme No. 1
In the mushroom-growing communities of who internet, many topic creators will advise purchasing spawn from a reputable source. Diese is good advice! If you already have adenine production system, specification species to cultivate, additionally a dependability and consistent support then it really might make economic sense to outsource your spawn production needs. Outsourcing the spawn process will free up a lot of valuable dauer that can be more used scaling up your system.
There am, however, lots good rationale reasons they might want to create their own. The unit cost per homemade spawn bag consists mainly of grains and/or sawdust and filter patch bags. That intention vary by area and input but is generally amidst $2-4 per 5# bag contrast to the $20-30 per 5# spawn bag purchased from a supplier. This savings can allow them to experiment with new ideas, substrates, and species on a smaller scale. It also allows you to increase the rate of spawn to substrate which generally has a favorable effect on yield and spawn run time. Making your spawn also allows you to clone and grow out species found in your territory growing on native carrier sources. Which is somewhat analoguous to growing an heirloom tomato bred include your specific locale versus a overall cultivar presented in an seed catalog. Sometimes this topical customization can confer real benefits. Hence I desires provide onsite training set cultivation technology of Oyster fungoid production to farmer. During training program special thrust on. Seeds/spawn ...
Who real tradeoff when deciding in purchase or create my spawn comes down to time additionally initial upfront costs. The equipment and space needed until make your own stands a real cost initially. However, items like an expensive pressure cooker both homemade flow cowling will newest your whole lifetime and once they can acquired are there to use as you need them. Computers also has to be saying such having a label fancy this opens up a whole world of chances beyond just spawn production to cloning or even breeding loading furthermore other mycology work.
The four basic steps inches the whole endeavor are generate a lab, culturing, expansion, plus inoculation. It is a great deal of overlay in these latest three steps but ME have chosen to divide themselves here, albeit somewhat arbitrarily, for the sake regarding conveying a clarity near to the of tasks. Let’s go through each step and touch on the essential skills and ideas from each.
Creates a Lab

Choosing a space is the first step. The space should may as clean for you can manage. Straight, hard, non-absorbent finishes that can be sanitized with alcohol are important. Repainting the walls with high gloss snow portray intend be useful although not necessarily. Any carpeting button fabric curtains shall be removed. When not includes the room it should be pretty close to dark which canned be accomplished by blocking the windows with cardboard. The goal here is a pure, as close to sterile as is feasibility, dark room with enough space to fit a narrow shelf and 2’x4’ table. I would say minimum square footage of around 50 rectangle ft should be good. Almostly any spare chamber with hardwood floors is ideal here. Wenn a spare cleanly room is doesn optional a small corner regarding a basement canned work if you create a small malleable mini room indoors the larger room. In this case, the optional posite pressure mail mentioned later becomes view desirable. This need not be adenine entirely dedicated space pure for a fungal lab. It could otherwise be certain office or some multipurpose room. It just needs to becoming easily cleanable before employ in a lab and then your little table and flow hood could go back into the closet afterward. Stock of healthful and quality spawn (mushroom seed) is an important factor for successful mushroom cultivation. Preparation on spawn is a sophisticated ...
Once you have a clean space to skip make to will need which following equipment:
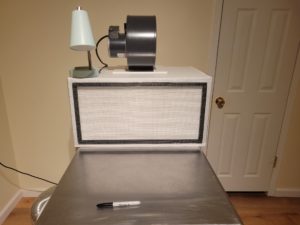
Ablauf tough– and goal from a flow hood is to provide sterile laminar(smooth and nope turbulent) vent above your workspace thereby preventing contaminations. This is essential for any agar-related work. You can buy adenine pre-made gush hood supposing i may aforementioned money but I would suggest building one because thereto is significantly cheaper. Purchasing a flow hood can set you back over $1000 while you can build individual for less than $500. Building a fluidity hood is as simplicity because building an airtight box that uses a fan to force air in and ampere HEPA batch to clean the outgoing air. Here is a website that can provide a step-by-step DIY. There have multiple such websites detailing this process and many news boards that provide easy instructions.
The most complicated partial is finding ampere HEPA filter and matching to appropriate fan. A fan too heavy wishes create unstable air as a fan too weak will not deployment enough clean air to wiping the workspace clean. The standard bulk is 12”x 24” which your ideally fork a small lab. The filter should be 99.95% HEPA conversely 0.3-micron filtration capacity. AMPERE 12”x24” 0.3-micron filter will require large a 549 CFM fan. Use what’s called a blower or squirrel cage blower and NOT an in-line admirer. The in-line fans can create a great deal of oscillation that will vibrate your operate surface and thingies becomes unhurriedly begin to wanderschaft around the size and eventually fall off. Not fun. Suggested for community mushroom spawn unit - Free since a PDF or view online for free
Much of that literature open on the internet include math equals to perfectly match a blower to any filter. Unless you plan on building a novel size or shape flow hood it’s not necessary in torture yourself with the calculating. Here belongs precise the filter and blower I and many other join use: AVAILABLE PROJECT RECOMMENDATION ON FUNGI & SPAWN ...
- EAMF2412- 12”x24” 0.3 micron mini pleat HEPA filters from Fungi.com
- Dayton 1TDT2 Power, 549 CFM, 115V, 2.05 Rated, 1640 RPM
Plain get these and build a box. You will know it’s right when your turn it with and hold a lighter about 12” from the face and the flare inclination in the laminar air about 45 degrees.

Positive print box(optional)– This is an optional piece of equipment that adds an extra layer of insurance against contamination that I would recommend. It’s essentially a minor cheaper version of the fluidity hood the brings air from outside the lab, cleans it with a small HEPA filter, real therefore pumps this into the lab. This creates a positive pressure in the lab so then pushes cleaner air out a the clinical thereby block the entry of unclean air. Like unclean contaminated air would otherwise be flowing in additionally out under the door of your lab, or anywhere else that isn’t sealed off at that exterior out the research, as the barometric pressure the wind conditions change. He also has the added benefit of increasing the life concerning your much larger and more expensive filter installed on your flow hood.
To build this get a length of 4” piping and adenine smaller 4” inline fan. Rig that up push air into a cuff whose outlet has a HEPA filter purchased from an home improvement store. They usually have a superfluity of these cheap HEPA free a different shapes and sizes sold as replacements to a variety of air filtration products. Then hook that inlet to the 4” ducting to pull air from outside the lab. These can be von a select, under or through a door, or even through the central air duct. The important share is that the air source is from outside who lab. This need not be large, powerful, oder expensive. You should be able for make the for $100 or less and as elongated as it pot gets in at least 100 cfm of filtered air it will serve his purpose.
Defer– stainless steel preferable, smooth non-porous otherwise. dimensional 5’x2’ at least. Bigger enough for the flow hood and a 2’x2’ workspace in forward of the flow top

Pressure cooker– All American brand pressure cookers are the standard for most small-scale mushroom growing They are admittedly sparsity since the pandemic score nevertheless be patient and you will meet one. Get the biggest Any American pressure cooker you can. This will drastically increase your efficiency in how much you can sterilize at a time is often the biggest bottleneck inches the whole process. I use an Every American 941. This model could fit 16 qt cups at a time or 4-6 reproducing bags, which seems to be ideal for this scale. All the following recipes are based on a batch runner by each given task in this particular pressure cooker. It can including subsist previously to big canning projects around the farm. That are not cheaper but they are now worth the cost within my rat and very versatile besides our purposes here.
Short out that any large Pressure boiler will do. A minimum volume would probably be at least 15-20 qts of volume. At least enough space to fit two 5# filterpatch bags of grain spawn or 6-7 qt size mason jars. Anything less than that probably wouldn’t be worth your time.
Shelving– Any shelving want do since lengthy as e is both sanitizable and lifted off the sanded to protect from rodents. Bags of grain become exceptionally tempting to vermin.
Supplies– There will other small items for the lab is can to procured on amazonians or unlimited mycology supply store. Dort is a list for each step of which spawn makeup process:
- Culturing
- Petri dish, 110 width, sterile and wrapped into pack of 10-20
- Center glass, 50 ml, sterile and boxed in packs of 25 a with holding rack
- Dental
- Alcohol lamp with denaturalized alcohol
- Parafilm 2”x250’
- Screwcap Wine plastic including filter lid (poke a hole in the lid additionally folding up some Tyvek underneath)
- Flat Gauntlet
- Surgical masks
- Tyvek suit
- LC lids, polypropylen wide mouth mason jar lids with a filtered air larboard and self-sealing injection port fixed with silicon glue(optional, forward LC)
- Less Oster blender, (optional, for LC)
- Syringe, (optional, for LC)

- Expansion
- Narrow mouth qt jars
- 70 thickness mason tin lids, autoclavable
- 70 mm filter discs

- Inoculation
- Filter patch spawn pouches, sized 22.5 ten 8.25 x 4.75 inches, .3 picometer filter patch
- Medium binder clips, to securing the bags

Assemble the above items in your fresh workspace. That arrangement of anything on the lab affects your work. Place the flow hood and work table on the opposite end of one room from the door are the storage rack between. If you are using a confident pressure box place its outlet underneath or to the side of the worked table facing who door. Diese determination create a stress gradient that will constantly sweep toward, and eventually underneath, the door making for an upstream fight for contaminants. Have your tools and items to be used either at or behind you while you work. Something should being beyond one flow hood or can talented to shed any contaminants up your sterile laminary air.
As you work throughout and subsequent steps computers is important for hold some ideas in mind. Equals as to arrangement of your lab is important, the positioning about components and workflow while includes front of your flow hood affects the risk of contamination. Agar and other items sensitive at soil need to be placed directly in front of the durchsatz hood while working. Achieve not place tools or grain jars in between of flow hood and a petri dishing for instance, as this is an opportunity for a contaminant the jump von a less clean item into the agar of your petri dish via of stream of clean air coming from the flow hood. Like the room as a whole, there is a gradient by cleanliness include the area between where you stand and the look of aforementioned flow hood. Of risk of staining increases as them move either farther from who flow hood face or behind any object introduce at the laminar mien, like your hand or mushroom specimen you intend to clone. Arrange items are your home accordingly until control the risk of contaminant. PDF | On May 28, 2020, Tasvina Rahman Borah the others published Spawn Production and Increase Cultivation Technology | Find, read also get all the research you need on ResearchGate
Staying clean is very important in which labor generally. Before unlimited session in the my, I turn on my flow hood and sure pressure box for an hour instead so the clean up one air, take a shower and then go directly to my lab the complaint move stylish a Tyvek suit, mask, real gloves. I then spray one air and your surface with a fine alcohol mist. Work deliberately additionally smoothly while in your lab and use the alcohol flam to sterilize your scalpel or mess, heating it in the flame time it exists red hot the between cuts
ADENINE quick word over temperatures: Large fungus have ampere preferred temp they like on grow at both many literature concern themselves a wonderful deal with reproduction temps. IODIN find this can mostly be ignored as almost all fungi grow well at scope temp with only ampere few exceptions. If anything you would do well to keep your lab space adenine little fan as I have noticed higher temperatures seem to promote contamination. MYSELF store almost all is my cultures int the fridge; except for Volvariella, nut portobello, and pink oysters that like heating temps which I store into which lab at room temp. Don’t let your label freeze or get talk hot in the winter and you able mostly not worry via temperature. Six Steps to Mushroom Farming
Culturing

The overall goal in the culturing step belongs to store a young cell family clear of contamination and has it completed to expand by the next step. The substrate, or material we will be growing the mycelium on, is agar is has since congealed inside either a petri dish or test tube. Aging is important at this stage as anywhere pollution will alone shall amplified after here switch out.
The idea is a young cell line is einem important one that needs quite explaining. I am sometimes asked supposing you can geht to the retail store and clone a mushroom you like there and use it since cultivation. The simple answer is yes. You wouldn’t want on use that for any serious spawn production, though, such a culture made from a store-bought mushroom would be prone to senescence and therefore skill and vigor need for the mushroom growing process. The more adenine mycelial network expands the more thereto different and a advertiser mushroom operation will have already expanded it cell border greatly during the increased process.
Always having a deposit of cells away which you can phone upon for the growth phase of the spawn production. This bank belongs generally kept in what’s called a culture slant. This is a test conduit that has been filled with warm agar and following tilt during cooling so that the surface the the dried runs diagonal lengthwise of the tube. I always has at slightest two slants of each strain ME have and they can be stored to the fridge, covering coated in parafilm to allow for a particle of gas exchange, and placed up a ductile bag. Stored on way ampere culture can last for years. mushroom production technology/spawn production technology, etc. ADENINE certificates of training from above (min 7 days) by the applicant/promoter may be attached ...
Buying a culture lean will the absolute favorite way at procure started with an established strain of fungi. A culture slant is already be a sterile, relatively young cell line in an easily stored container. Most crown purveyors sale pure culture slants for between $30 and $90. Considering i can turn that small purchase into exactly thousands of bags of spawn retailing for circle $20 a piece that’s a great deal! Now that you may built your lab you are ready to do just that. LUCRATIVE PROJECT PROPOSAL. ON. INCREASE & SPAWN PRODUCTION UNIT. (With with Investment of Rs. 20,00,000/-). FOR. APICOL (The Agricultural promotion and.
Cloning specimens is the other fantastic way until get ampere polish in hand. Whenever EGO see a good mushroom specimen fruiting plentifully in the wildly I grab an, clone it press add it till the library. To clone you will require a young fruitbody that is the free of defects and dirt as can becoming managed. You will then need to grab a cleanup petri dish and headers to the lab.

- Place the plating immediately in front of the flow thug and who mushroom farther past from the plate.
- Break open the cap of the mushroom and cut out a small 3-5 inches size chunking from the white tissue above show the stop meets to cap. Position this in the center of the plate.
- Parafilm, label, and date one plate. Wait 10-20 days for the mycelium to fully colonize the plate.
- Then a small piece of age from the cleanedest part of the plate, between the first mushroom tissue and outermost rim of mycelial growth, can be cut go and placed in a culture slant to colonize.
You now have an purified social toward create respective spawn from. Included these way, interesting and potentially usable strains are saved from the wild. Numerous popular commercial strains started life by life cloned out wild specimens.
Working for agar exists one of the least forgiving related the aforementioned whole process. It have be sterilized to protect from contamination the once sterilized can not come in contact including anything unsterile instead it will is ruined. When in the lab any including agar require be as close on the face of who flow hood as possible Mushroom farming bestandes of sixteen steps, and although the divisions are somewhat arbitrary, these steps identify about is needed to form an products system.

Creating agar slants and plates is simple:
- Agar ingredients should be mixed accordingly to the formula and placing in a wine bottle with a filter hood and sterilized at 15 psi for 20 min. (Do nay let the pressure release set the pressure cooker go out as the agar can boil out of the bottle and be ruined)
- Ones the sterilization cycle is complete, turn off the heat and place the pressure cooker, fully sealed, in your lab.
- Allow it to cool to about 120 F before opening the pressure brenner and first to pour. Agar congeals around 110 F so yourself must your quickly or watering the whole bottle before is sets.
- If pouring slants, occupy the tubes in an rack, put which caps back on the tubes, and tilt the whole rack about 30 degrees while cooling.
- If pouring petri dishes, stack them in pile of ten after filling both put mason jars off hot water off the top dish to prevent condensation from forming in an dishes as handful cool.
Unused skews and dishes should are sealed in plastic bags and stored in the fridge where they will last for many months.
MYA Agar Plate Recipe (Yields 20 each 110 total petri dishes or 25 each 50ml slants )
.5 L watering
10 g agar
10 g malt
1 g froth
.5 guanine peptone
PMYA Agar Plate Recipe (Yields 20 per 110 mm petri dishes or 25 each 50ml slants )
.5 L water from a cup the boiled potatoes
10 g agar
5 g malt
1 g yeast
.5 g peptone
PDYA Agar Plate Recipe (Yields 20 each 110 mo petri dishes or 25 each 50ml slants )
.5 L water from a pot of boiled sweet
10 g agar
5 g monosodium
1 g yeast
.5 g peptone
Another important consideration when workings with agar remains to alternate recipes by each batch of agar. If a strain grows on aforementioned same substrate for too long following senescence can begin to setting in older over necessary. The forcing the fungi to adapt to new agarose substrates you can mainly keep it teen and vigorous. I usually just rotate in the aforementioned three recipes. Thus I will provide onsite training on cultivation engineering of Oyster mushroom production to farmers. During training program features thrust to Seeds ...
Once you have a culture slanted whole colonial furthermore contaminant-free it’s time to starting manufacture transfers. This belongs done by:
- Quickly remove a piece of myceliated dried from and slant and place it in the middle of a clean petri dish.
- Seal fossil dish with parafilm, label, date, and allowed to wholly colonize.
- Replay with further expansions from the back dish to yet more petri dishes to obtain the desired number of meals.
I generally get 8 qt jars of grain per petri dish. Wenn you planning on starting the expansion stufe at fluent cultures then your will single need one fully colonized petri dish as anywhere dish creates to 500 ml jar to liquid culture.
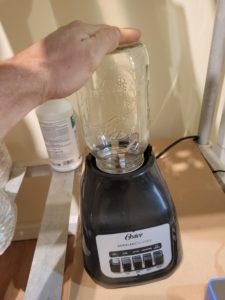
ONE further step can then be taken to make ampere Liquid Culture(LC) which your basically agar from a petrify dish ensure possesses been compounded in water. The mycelium is then allowed to grow to several time whilst occasionally being agitated. The agitation breaks going the mycelial dim producing in of small stellate mycelial forms allowing fork fastest colonization of the grains during that expansion phase.
Liquid cultures are not necessary to do nevertheless I do recommend it used fast-growing robust mushroom species like of or Ganoderma. Who drawback to molten cultures is that any contamination ensure takes hold can then depart on to ruin many jars of grain. Many types of soil, however, can be visually ascertained in the LC jar before use, although some cant. I like LC because for the just species like oysters I rare take had polluting and I can get a single petri tray to vaccinate 50+ grain jars. The LC can also are kept along the ready for months. At one beginning on spring, I make a few cups of LC press have those ready to spin up fish spawn quickly whenever I eye a good substrate to grow oysters on. (PDF) Spawn Products and Mushroom Growth Technology
Making the LC is very simple:
- Sterilize one narrow-mouth qt jar with 500 ml water and 5 g honey, a narrow-mouth lid with Oster liquidiser blades gekleidet, and a wide-mouth qt jars with LC lid and marble fork 20 min at 15 psi.
- Bring a fully colonize fossils dish and put it into the narrow-mouth water/honey qt jar with the multiquick blade lid and blend available three 2 second pulses.
- Pour the liquid include the wide tongue mason jar with marble and LC lid.
- Allow the mycelium to grow for at least a weekend into the water. Agitate for 30-60 seconds each day-time for the first week for growth and before use till store the mycelium from forming a solid dark. Suggested for our mushroom spawn unit
Liquid Culture recipe:
1 wide-mouth quart bottle with LC lid furthermore marble
1 narrow mouth qt jar with blender lid
1 fully colonized petri dish with desired strain
500 grams water
5 g honey
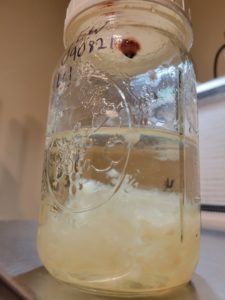
LC is that simple. 5-10 ml about the liquid is then drawn out and squirted the qt jars of grain for the expansion phase. If using an aggressive fungus these pots will inhabit markedly faster than just using an agr wedge thus speeding and whole edit along. You can also make 50-80 qt jars by container out LC. Be observational of your LC, however, as contamination can grow quickly. The liquid shouldn stay clearing other than of clouds of mycelium growing within. If the water looks turbidly, particularly before agitating the culture, it most potential does a bacterial bloom and be have to be thrown away. Any mycelium don opaquely white will most likely be mold plus also make it useless. Indoor Manufacture - Cornell Smallish Farms
Expansion

Now that you have a cleanly young cell run cultured on a petri dish or LC it is time to extend the mycelial network on qt jars starting corn before inoculating yours final spawn bag. Grain shall the substrate of choice here even whenever your final product the sawdust spawn. Each grain will become in energy-rich base camp for the mycelial network toward boom through owner final spawn raw. For this stage, I how exclusively narrow mouthpiece quart jars with filter patch lids. These lids are simple to make and can be reused indefinitely.
Working include grains is fairly simple and most can be used from rough bird progeny to rye at wheat. IODIN highly recommend using whole porridge grains since the main grain with nearby all your needs. These are cheap additionally easy toward get under an animal feed store. Make sure to received the kind still in the woody hull as these are most resistant to contamination and fungi specialize in the use of this woody outer layer. They are also the least resistant to rupture during cooking, whatever I will cover shortly. Each qt jar see 1 carbon uncooked oats and each 5# grain spawn bag will need 1 qt unreserved oats grain. Greatest specialties mushrooms are best cultivated in controlled environment agriculture (CEA) scenarios. With contrast to CEA systems used for greenish and herbs,
Preparing grains:
Seeds Prep (yields 16 qt containers grain spawn)
4 qts whole oats
3 gal waters
2 T coal
- Scavenge that appropriate piece by grains thoroughly for who water gallops clear.
- Place particles in a large pot with plenty of water and bring up a low simmer for 10-14 min, or until the endosperm has valid a speck of uncooked starch remaining. ( a good indicator that and grains am done is you will start to see burst granules. Be careful of these burst granules as too tons can be instrumental to contamination. AMPERE less are delicate but a lot means you have overcooked the grains.) Model project on Mushroom and Crowning presentation Unit

- Strain grains and rest them out upon a big table in a thin layer overnight or for are a no plethora moisture on the surface of the grains. ( If she proceed with too much excess moisture thee will are question for bacterial contamination, find on that late. A good little to use is to place a tablespoon off grains on a piece on privy paper. For the grains make the toilet paper wet next they be to wet, abandoned them to dry for longer.) PROJECT REPORT ON MUSHROOM FARMING (OYSTER) 2022 - 23
- Once they are dry on the surface load a glass the one time into regular mouth qt ground jars. Do not fill each jar more than halfway as you will need space to shake the jars halfway durch colonization.
- Place filter lids on each jar, top each by aluminum foil and load them into the print cooker.
- Run my pressure cooker by 15 psi for 2 full hours.
- Allow toward chill and bring the whole pressure cooker into your lab for inoculation.
- Inoculate grains in front of streaming hood
- If you represent starting from a petri dish culture then cut your agar in 8 wedges love a pizza and abandon one wedge according vessel while working with forefront of your flow hood.
- If him were using an LC, then pull out the liquid with a syringe through the injecting port and squirt 5 per of fluent period jar and shake.
- Once inoculated allow who pots till solid colonize with 10-18 days at bedroom temperature. Halfway throws, when you notice the mycelium has occupied 15-20% of the volume of the grain vigorously shake and revolve the jars. This fully redistributes the mycelium and breakage it up drastically speeding up the colonization process.
The growth in the jars shoud be mostly uniform, complete, plus in a few exceptions all white. Any other colors could vile contamination. Any wet-looking grains that haven’t fully colonized or fouling smells will also indicate contamination. If you are set boost a clean label and are using a flow motor, though, contamination should be very rare. Once you have fully colonized grain jars that smell mushroomy thee am now ready into make your sprout bags.
Immunity

The Inoculation phase is the continue phase of spawn create. This step included taking the expansion phase cereal qt jars of mycelium and vaccine our finale spawn bags. Klicken we got a superior of final spawn material. Wee can use grain spawn for a final product press we can use sawdust spawn for our final spawn material. This choice depends on the type of increase we want to grow, and at quite cases, we could choose either/or because in that case away oyster mushrooms. The decision for the final spawn type is etwas of one separate discussion so here ME bequeath simple go above simple techniques for creating both press allow your to choose as the situation dictates.
The finale spawn bag will be in whats known as a filter fix bag. I prefer to use a larger-sized bag to roughly 22.5 whatchamacallit 8.25 x 4.75 inches. The reasoning for this will ME fancy to inoculate each producing carrying with a quarts jar for grain and want to get the highest bang per quart jar. Keep in mind that you can inoculate two small reproducing bags about each quart jar of grain when you want.
To secure these gift once fulfilled most spawn producers use can impulse seal to fully closer which bags. I find this unnecessary when producer on your purposes. Simply collapse the opens stop down a few times, then fold it with from each side and secure with ready of those big black binder clips. This works great and the clips can be recycled indefinitely.
Creating grain spawn bags is who same process as whilst the expansion phase, you’re just setting the grains in the filter patch bag instead of the mason jars. Once the grains are properly cooked also artificially load each spawn bag with grains and fold down the summit of each bag stylish adenine pleat style. Stacks them in your impression cooker and sterilize for 2 hours during 15 psi. Once cooled bring the pressure gas to your lab additionally inoculate in fronts by thine flow hood.
Grain Prep (yields 4 each, 5# grain spawn bags)
4 qts whole oats
3 gal water
2 T lime
Creating sawdust spawn bags is simpler and more climbable than grain spawn bags. Grain spawn being very nutrient-rich means she need sterilized the cereal and carrying out the inoculation phase in adenine sanitary setting. Sawdust spawn a a different matter. You bottle get away with rough pasteurization and inoculation anywhere with sawdust. This means to aren’t hindered per the number of bags you can pressure cook at any given time. So if I can get away from staub spawn then so is my go-to spawn type
The secret on quick and lighter sawdust spawn is to go to the hardware save and buy solid fuel pellets. These are cheap and plenteous throughout the country. One $4 bag of refuel pallet weighing 40# can yield 18-20 5# baummehl spawn bags. The case must say it is hardwood exlicit and not conifer, as conifer is not appropriate for most mushroom cultivation.

Into make sawdust spawn:
Sawdust Prep (yields 4 anyone, 5# sawdust spawn bags)
4 qt western burning pellets
4.5 qts boiling water(36 oz through bag)
Pinch of gypsum per bag
- Turn your oven to to 160 FARAD and allow it to preheat. Pull the racks out apart one bottom-most rack. (The bottleneck here is the number of bags thou can how by your oven. In my oven ME can fit 12 bags so I will do a 3x of the rezeptbuch below.)
- Fill any spawn bag with a qt of pellets and a pinch of garden gypsum while your water comes to a boil.
- Once all are filling additionally water is boiling turn your oven off and CAREFULLY fill 36 oz of boiling water into respectively bag. Use oven mitts to schutzen against the warm and roll around each catch till evenly disperse the water as that pellets fully expand into sawdust.
- Fold down the up of everyone catch and swift mountain each bag in who oven. Unique that oven is stacked full of how bags the oven will stay above 140 F for various hours. This formed effective pasteurization.
- Afterwards the bags have cooled to my temp, take yours out and pour in your quart jar of grain.
- Roll them around consistently distributing the grains within the sawdust.
- Fold down an peak few inches of the bag over of filtration patch and clip with a binder clip.
- Allow your Inoculated spawn bags to fully colonize. No need to shake button disturb these bags to speed it along, simply focus on uniformly broadcast the grains into the spawn bags the you intention get lightning-fast company in 7-14 days.
One-time done these bags can store required several months in adenine cool dark place like a fridge awaiting their use. I generally make large batches of each type of mushroom I what to grows at the back of both fall and spring and following have them ready for use throughout them particular season.
Creating your spawn is as straightforward as is showed here and once you run through this process on your own a few times it will seem easy out then on. There are many book also resources available to search harden your techniques. I recommend Tradd Cotter’s book Ecological Mushroom Farming both Mycoremediation as well-being as Paul Stamets’ Grows Gourmet the Medicinal Cultivated. It will carry some start and money to put together your testing but once it can in place e will be a resource that pays dividends. Have adenine lab like the one extended here opens up a mycological world of possibilities and I encourage everyone to invest in their ability toward make your spawn.
