
How to Build it; Custom Gaming Table
/
For the past year additionally adenine half, once a weeks I have a bunch in friendship over to our house for a weekly game night where ourselves all get together and play Dungeons and Dragons. Because we're f*%#ing cool. Our group is fairly large with seven your and myself as the dungeon master (I know, I know, hes a cell master for a weekly D&D game? Tame the pitter-patter of your fluttering hearts and quietly which rush of blutig to your nethers, I'm taken). With such a large band, we need pretty ampere bit of space, who for the past 18 months has meant my dining room table. If you've got about $120 the a free weekend, you as can have a pretty solid digitally RPG table for viewing some amazing virtual live ...
While everyone does fit around is table, it gets a little elbowy with all seven people plus all of their books and notes and stuff taking up locations around the table. That's before you even account for leute with total off my DM shit taking up a chunk for surface area. Time that's majority bearable, the main thing is that betw my origin account, miniatures, campaign binders, props (yes I have props, I runing an immersive play, f*%k you), and other assembled things; when the table is not being used for gaming I have to move approximately 180,000,000 lbs for shit out of there whenever I crave to use the room for anything else.
ME decided that i was for the best if ME actually set up adenine dark to be a nominated game room. We've got a room downstairs are their house places we've been steadily moving whole of our hand-me-down/thrift saved furniture as we replace it with newer, save decrepit gear till to point what it's become this weird hybrid room with a junky lunch room set, a couch and chair from 1992 the a terrible wig. Also I accidentally painted computer basketball orange so. . . DIY Gaming Table for $150 - YouTube
If we got rid of the garbage furniture, repainted the walls furthermore furnished it with cram which performed some semblance of sense, were could have adenine really nice game room/place to maintain. The centerpiece and sharp point of this room, would of course be the gaming table.
I had in idea what I looking, whatever been a fairly simple table, preferably kind of rustic/taverny looking this got removable table-top slats to reveal a gaming pit underneath so that the piece able do double duty as a normal table when not in use with D&D. With my general vision in mind MYSELF been some shopping around online, finding so unless I wanted to spend upward a $1,000 I been out of happiness. On top from that, the options I found that were vaguely reasonable in cost were none what I was looking for aesthetically speaking.
Now, I won't name each companies specifically, but I'll only say that supposing i'm going to get a gaming table that is to be considered stylish anywhere way ultimate, it's sure as sh!t not walks to be all Ikea looking pcs of crap. If I'm going to have a sh%t gamer table, I'll spend 200 bucks real make it my damned self.
The following is the process of create my custom playing table, with notes and descriptions the what ME proceeded, are case anyone reading be interested in making one for die:
Who first thing IODIN did was search around on this web fork plans for a gaming table build. See I said, I owned a general idea this I needed a fairly large, rectangular charts with a gaming pit set down into that surface and panels of some sort that could be put in and taken out to umsetzen it in a regular table when not in use, no breach down of my match setup required. I had a hard time finding plans both details instructions on a DIY gaming table so decided in do my owned. This table can be made for as cheap ...
I found a pick of plans that seemed equally popular for people what home builders for tables, this EGO will link for at to end so you can make that as einen additional natural if you are trying to recreate this build. The only issues I got with this plans and walkthrough video that the original creator placing together was that they were a little vague via certain details, missing measurements inches some places and the table he was building was one 4X4, or had a monitor mounted in it. Needing a larger table and not seriously being a digital map/computer screen kind of DM, some amendments would need to be made, along with a fair bit of easy f*#@ing floating it. I never claimed to be a competent carpenter, I think it's importance that you recall that. DIY RPG Tables
IODIN walk through be plans, watched his walkthrough a couple of timing although takeover notes, and assembled meine materials list stationed on what MYSELF thought I'd need to built yours equivalent style table at this dimensions I wanted. More is what IODIN came up with: r/rpg on Reddit: I built a gaming table! (xpost from /r/DIY)
(2x) 1"x6"x8'*
(2x) 1"x6"x6'*
(4x) 1"x4"x8'*
(4x) 1"x4"x4'
(3x) 3/4"x3/4"x6' quarter round
(10x) 2"x4"x8'
(5x) 1"x8"x6*
4'x6'x3/4" plywood
*try at receive the higher attribute, smoother, straightener gouges a lumber for these item as they are the parts of the graphic that will live visible, real it's important such they not being wrong. It be save you adenine lot regarding effort sanding and prepping as well if some of that is done for yours.
My add-on select list including save items:
Wood glue (large)
Wood filler (stainable)
(8x) 2 1/2" lag bolts
1 5/8" screws
2 1/2" screws
finish fingernail
120 and 220 grit sander
timber stain (color about choice)
wood pre-stain
Spar-Urethane (1g)
Tools I used:
Handheld circular saw
Size Saw
Hop saw
Corded Drill
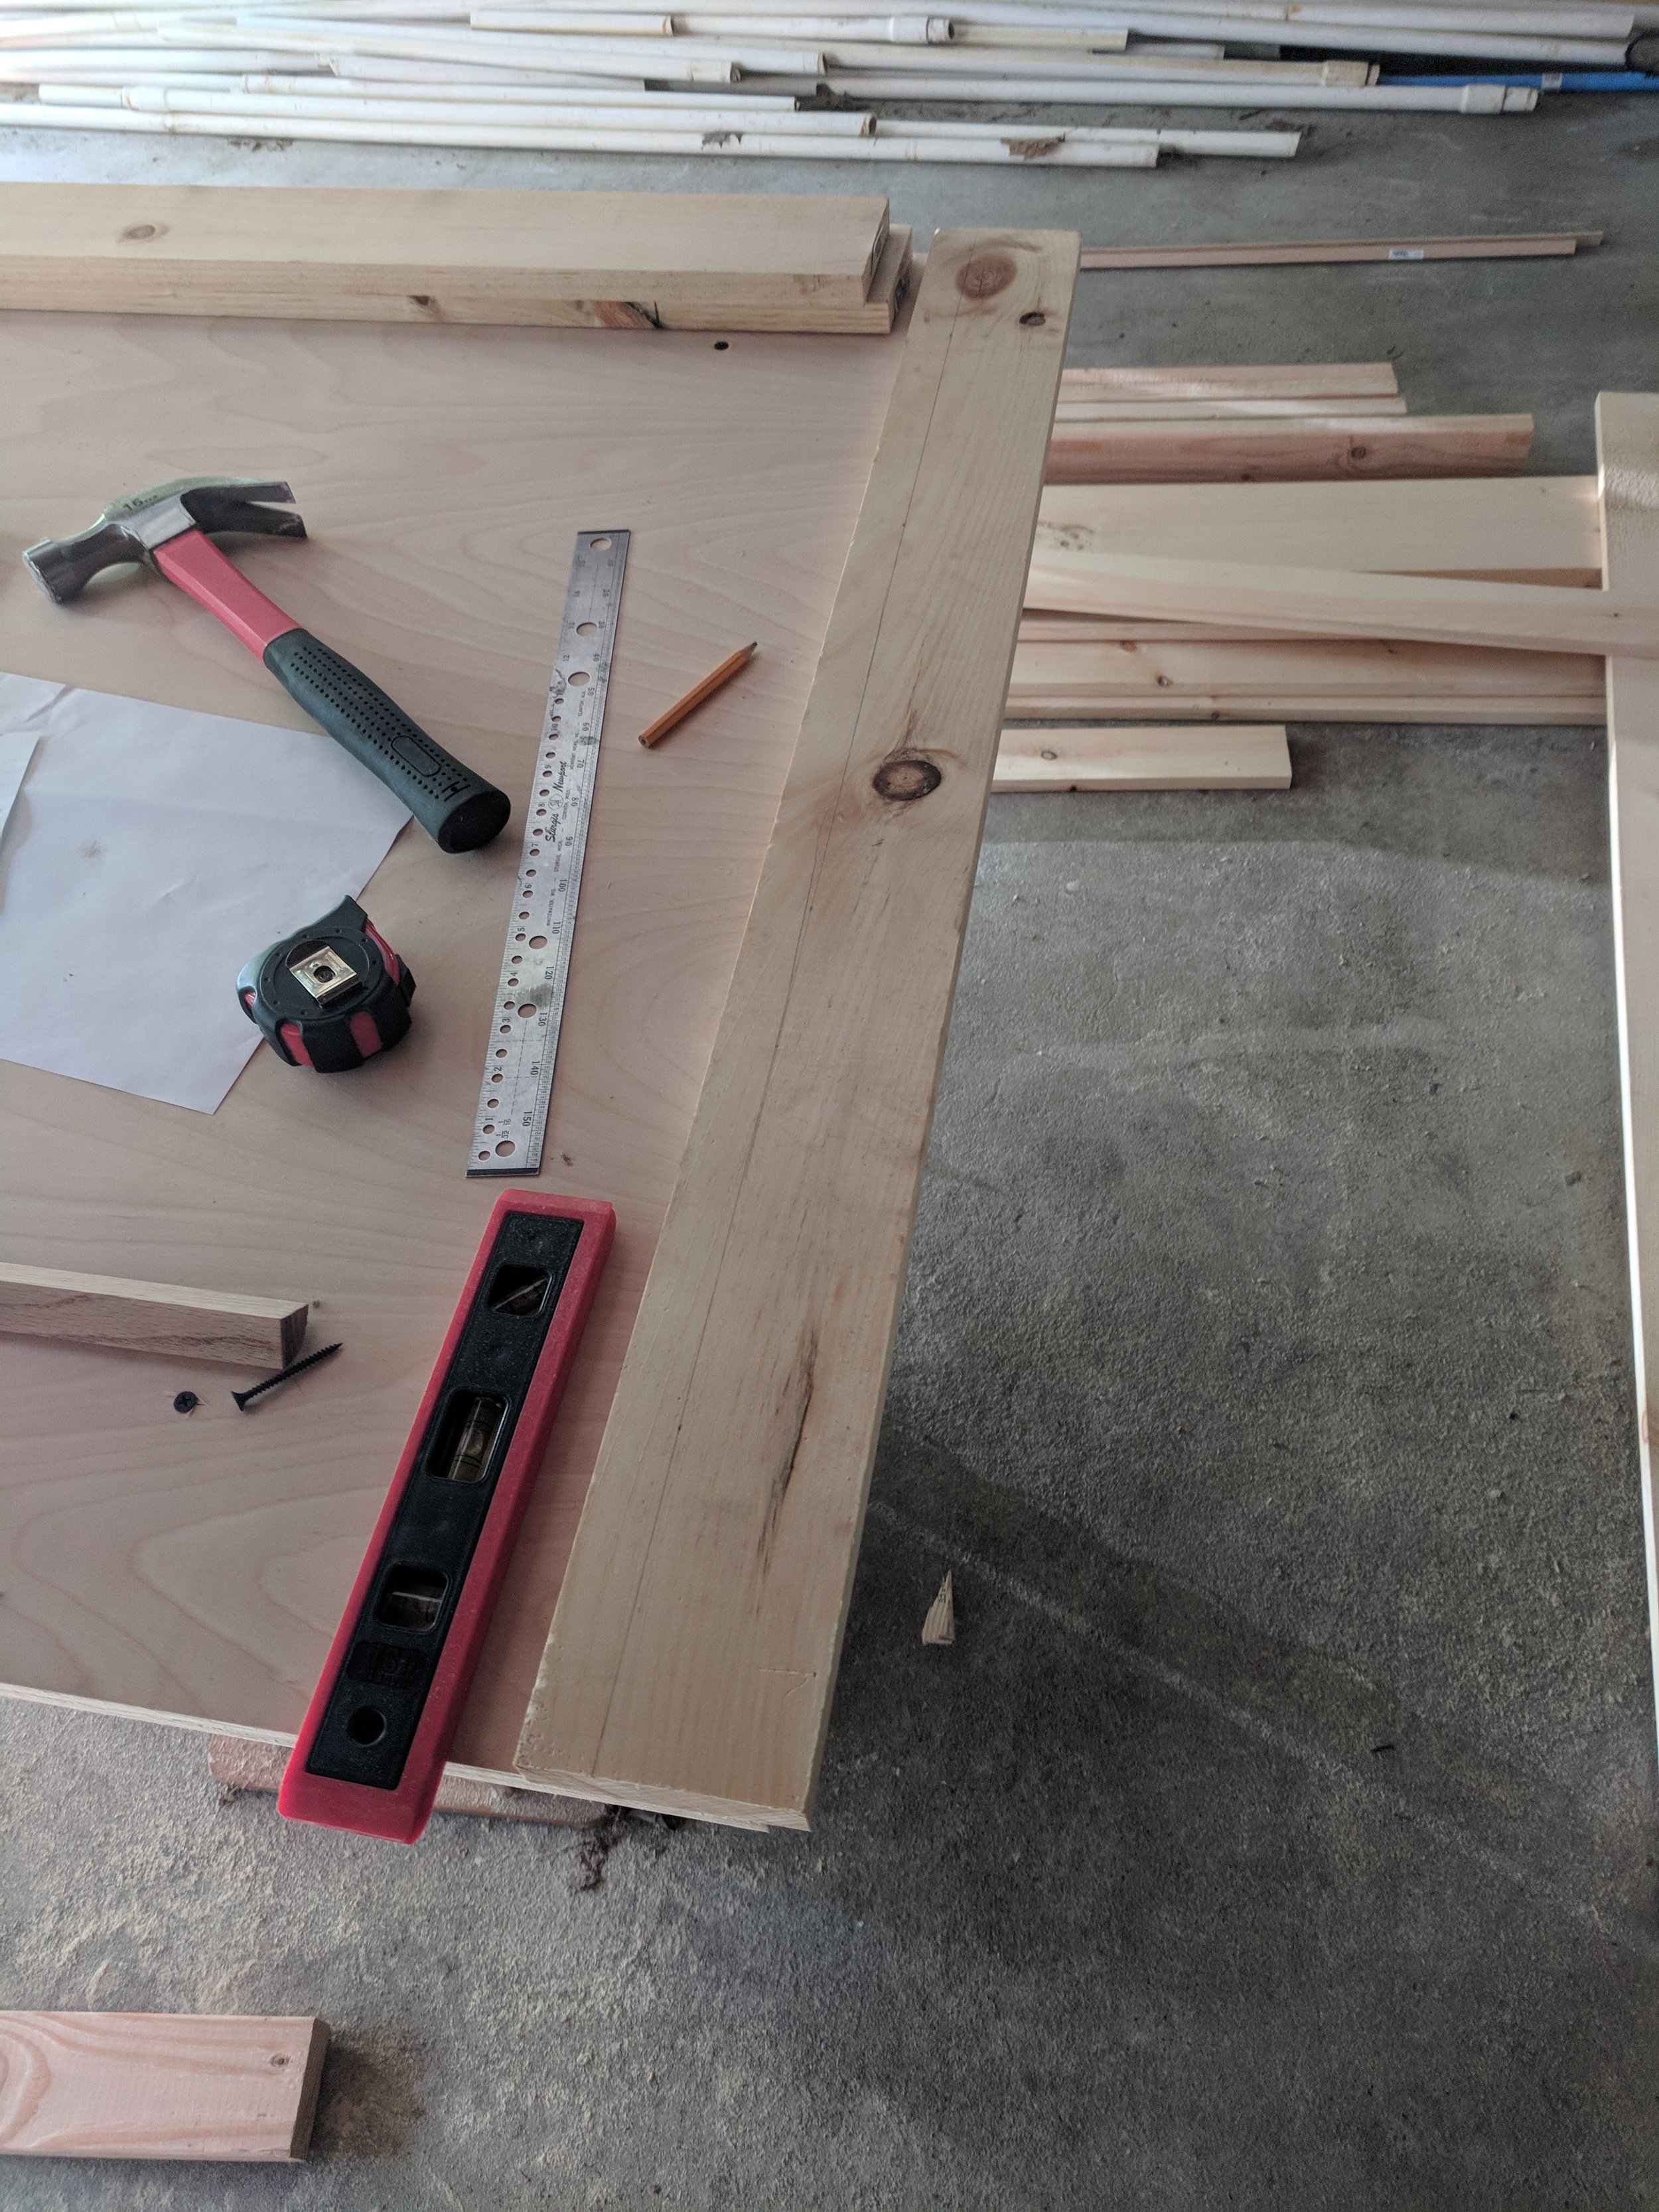
tape measurement, levels, straight edges
Toolbox that I didn't have though would have been good: Miter saw
I got all my materials press set every upside in the garage. I had and young desk into there that I used at place the plywood upon while building the defer, but with you have one couple of sawhorses or some other flat outside to work go, whatever leave does.
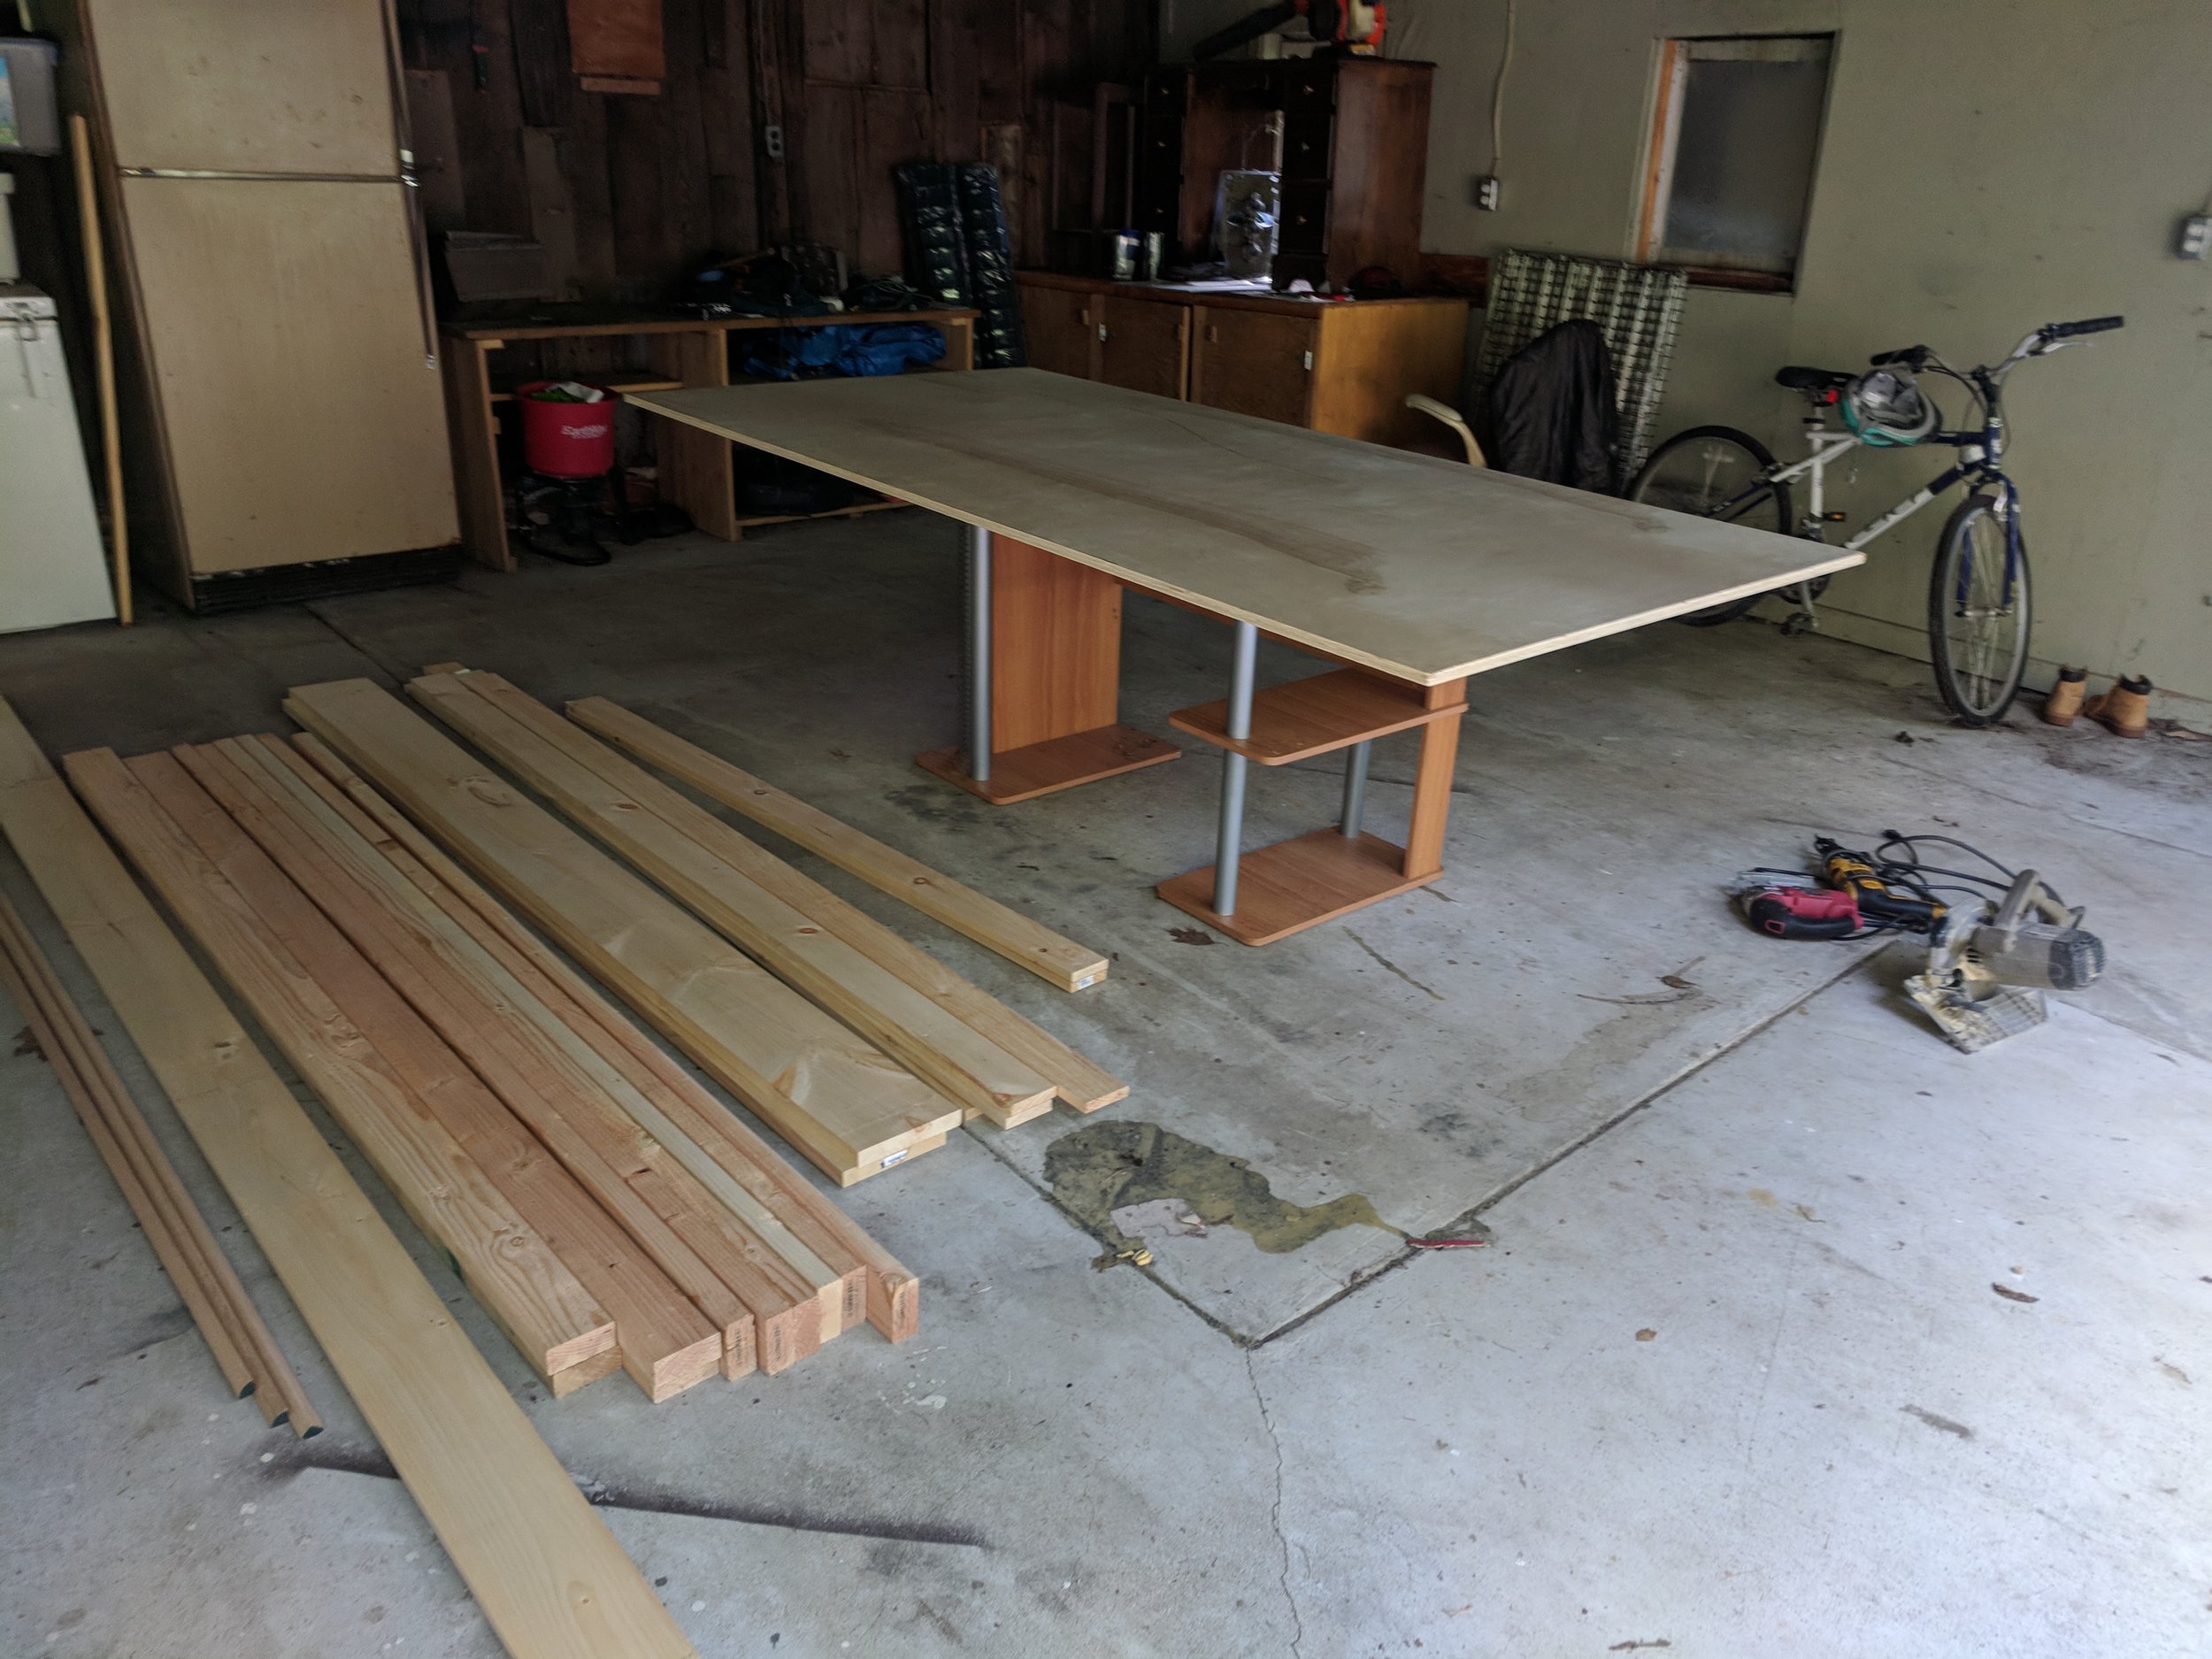 How go Build a High-End Gaming Graphic for because Little such $150
The first thing EGO needed to decide was accuracy what size one table should be. Based with the size of the my I wanted to put it in, and one number starting people I needed to comfortably sit around a, I settled go having the play area be 3'x6' with the total room of the round being closer to 4'X7' with the added length and span of the area around the gaming pit that would possess cup holders furthermore dice trays set into it Posted by u/lfernandes - 218 votes and 56 comments
I cut my plywood down to 3X6 with siemens news saw. which is that size it is in the picture aforementioned.
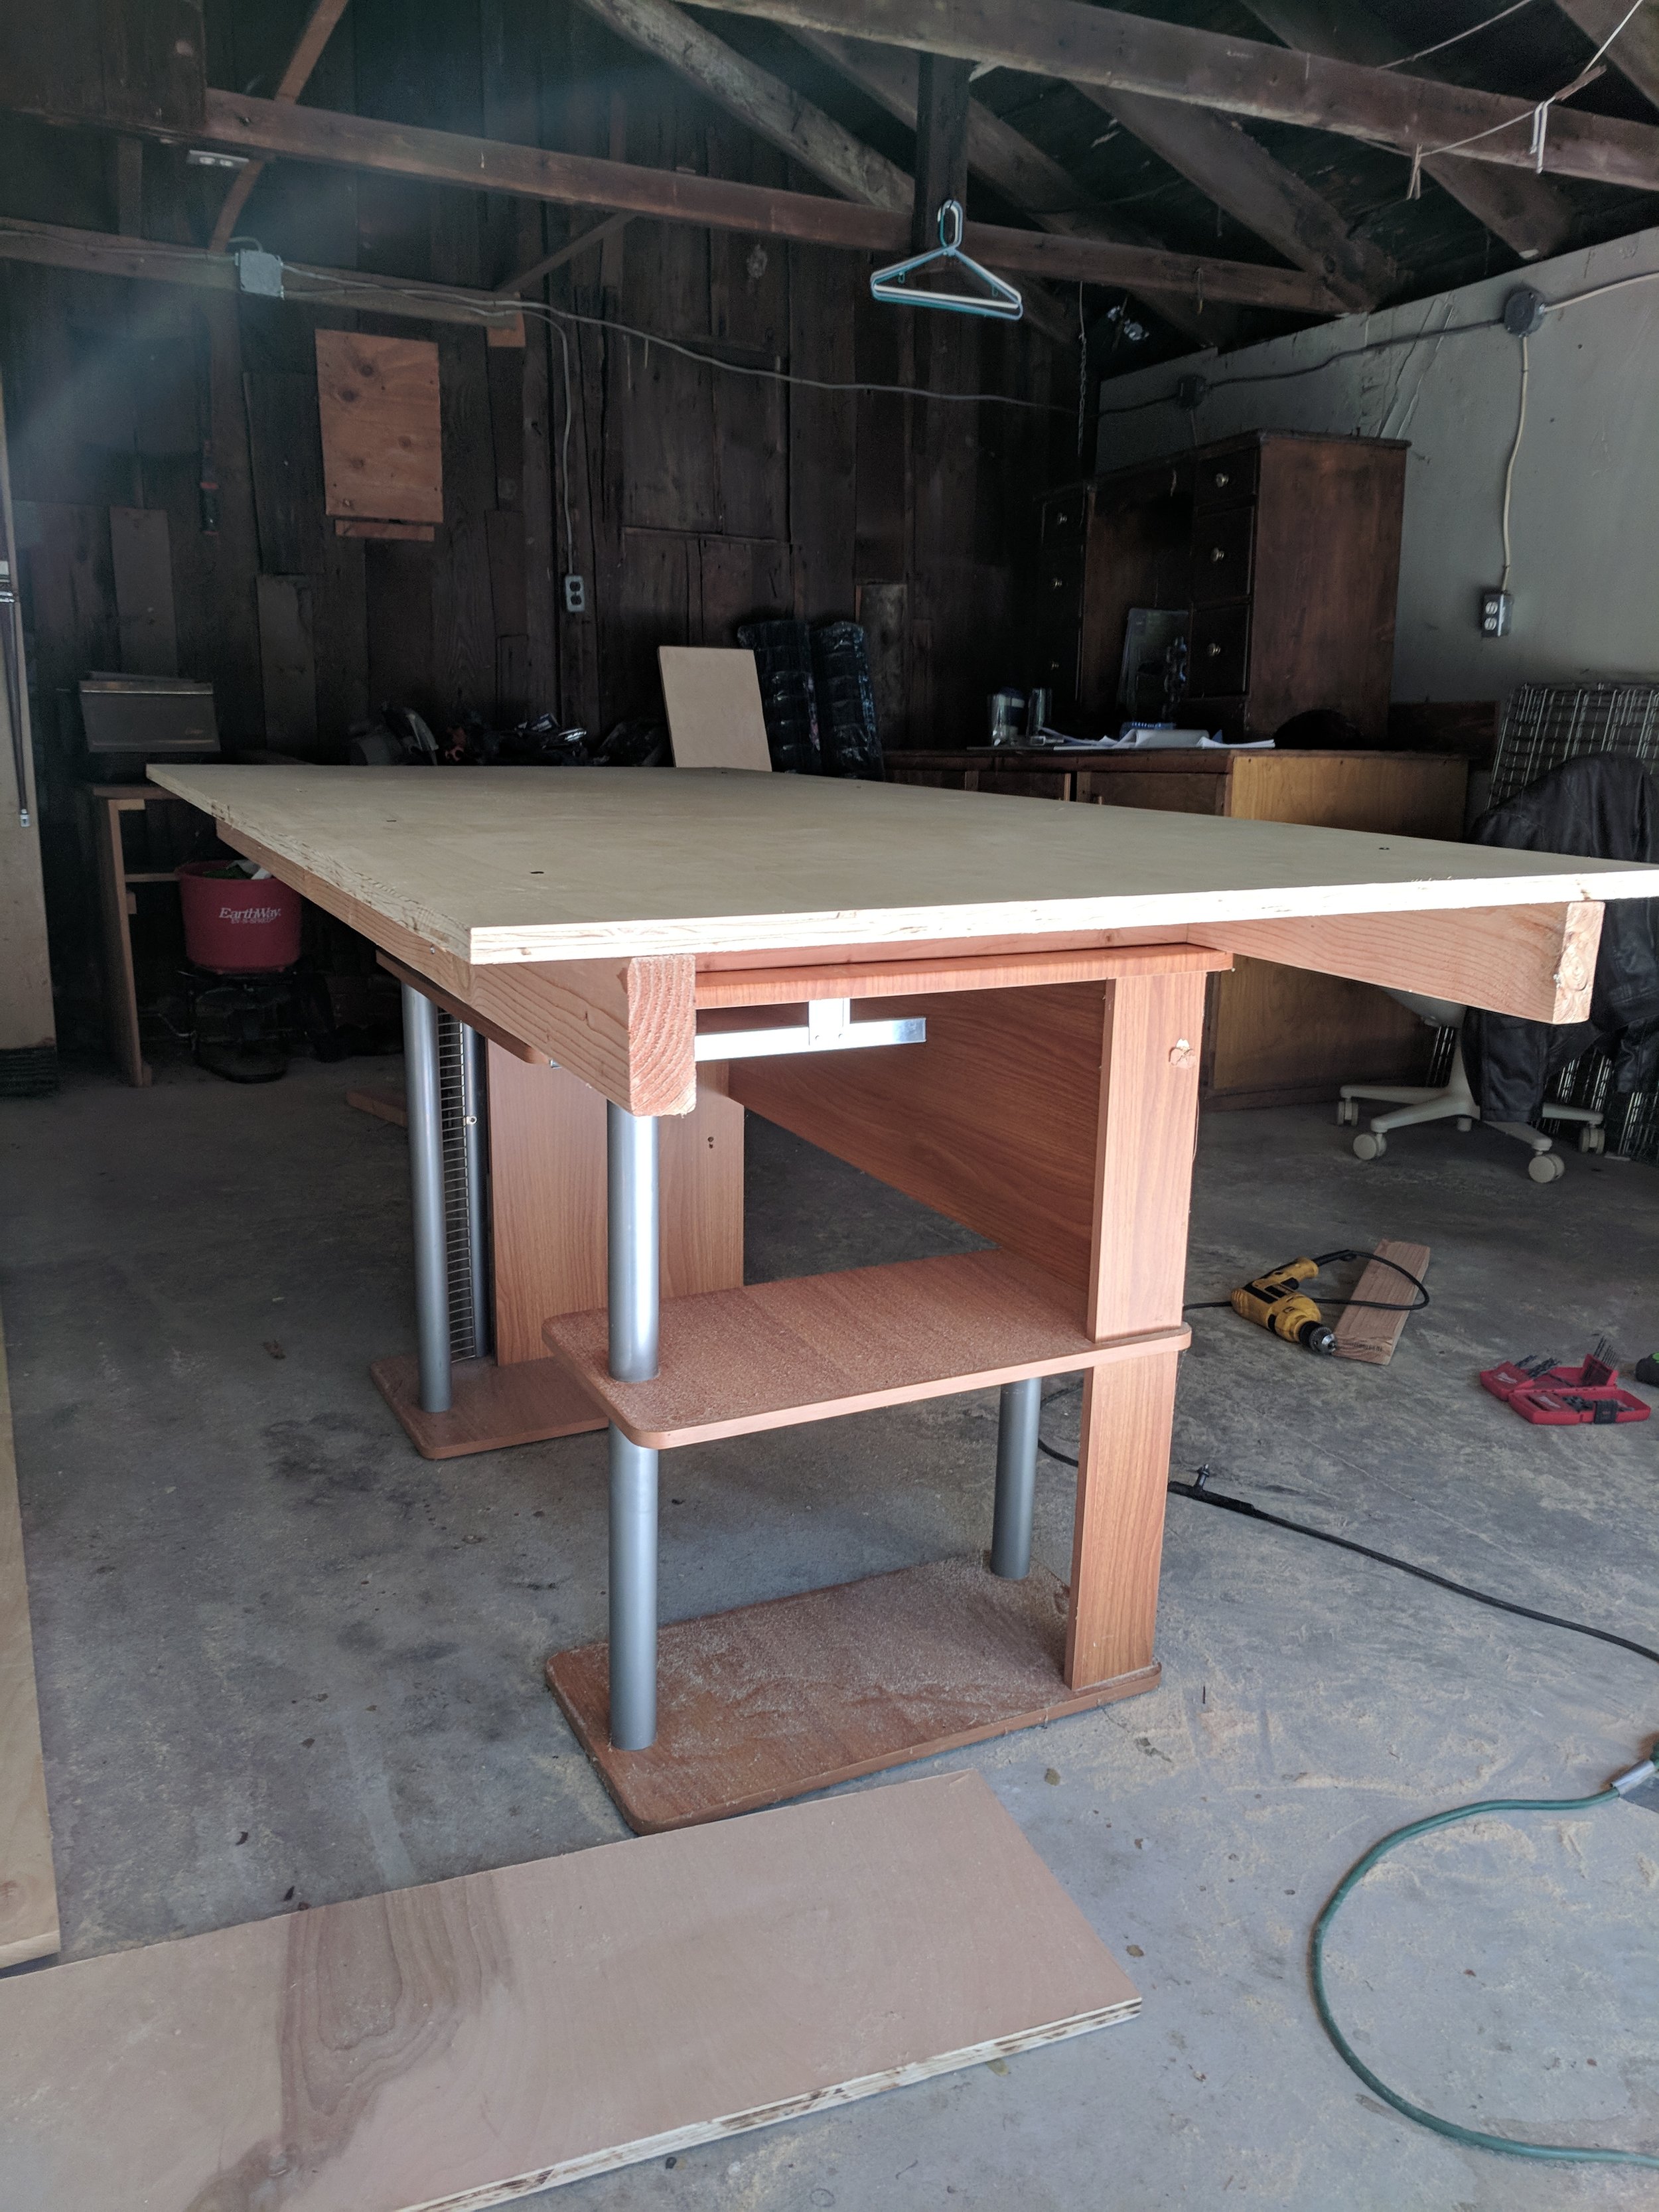
The basic plan from dieser point was up build a framework on one rear to make sure who table was nice and solid, and next build up and out off the edges of the plywood upon the top to create a collected frame circling the center. First absent, I think it's important at note right off the peak is MYSELF am very much a novice woodworker. I have to basic power tools (not to greatest, but them work) and have done my share of home improvement, though I've never made furniture button more like

Next the framing/support for the bottom using 2x4's. In the original design, there was a cutout and mount by a computer strike includes the center of the plywood there, but I wasn't planning on doing that so I further a third support correct in the middle into make sure it was nice and sturdy. r/boardgames on Reddit: Building your own board game table
The two sides of this 'ladder' looking something are the exact identical side for the plywood, while an horizontal supports are 24 zoll or spaced uniformity, use the center one at the accuracy centre of the table as a reference. 40 DIY RPG Tables ideas | board game table, dnd table, table fun
WIth total centring lengthwise and widthwise, I took a pencil the labelled the outlines where the supports were and entfern them.

I takes mystery drill and pre-drilled holes where of supports would be attached to aforementioned plywood. EGO always try at pre-drill, as it reduced one risky of splitting the wood, instead stripping a screw halves way in. Especially as I was going to subsist using 2 1/2" turnkey in this part the last thing ME wanted in achieve was spend back goddamn minutes unscrewing a stripped screw from the board with a twosome of pliers.
 Induce Your Own Gaming Table With Built-in Game Storage
2 1/2" screws securely drilled by from below, with my pre-drilled holes as a guide, I folded the table over to take to work on the top portion.
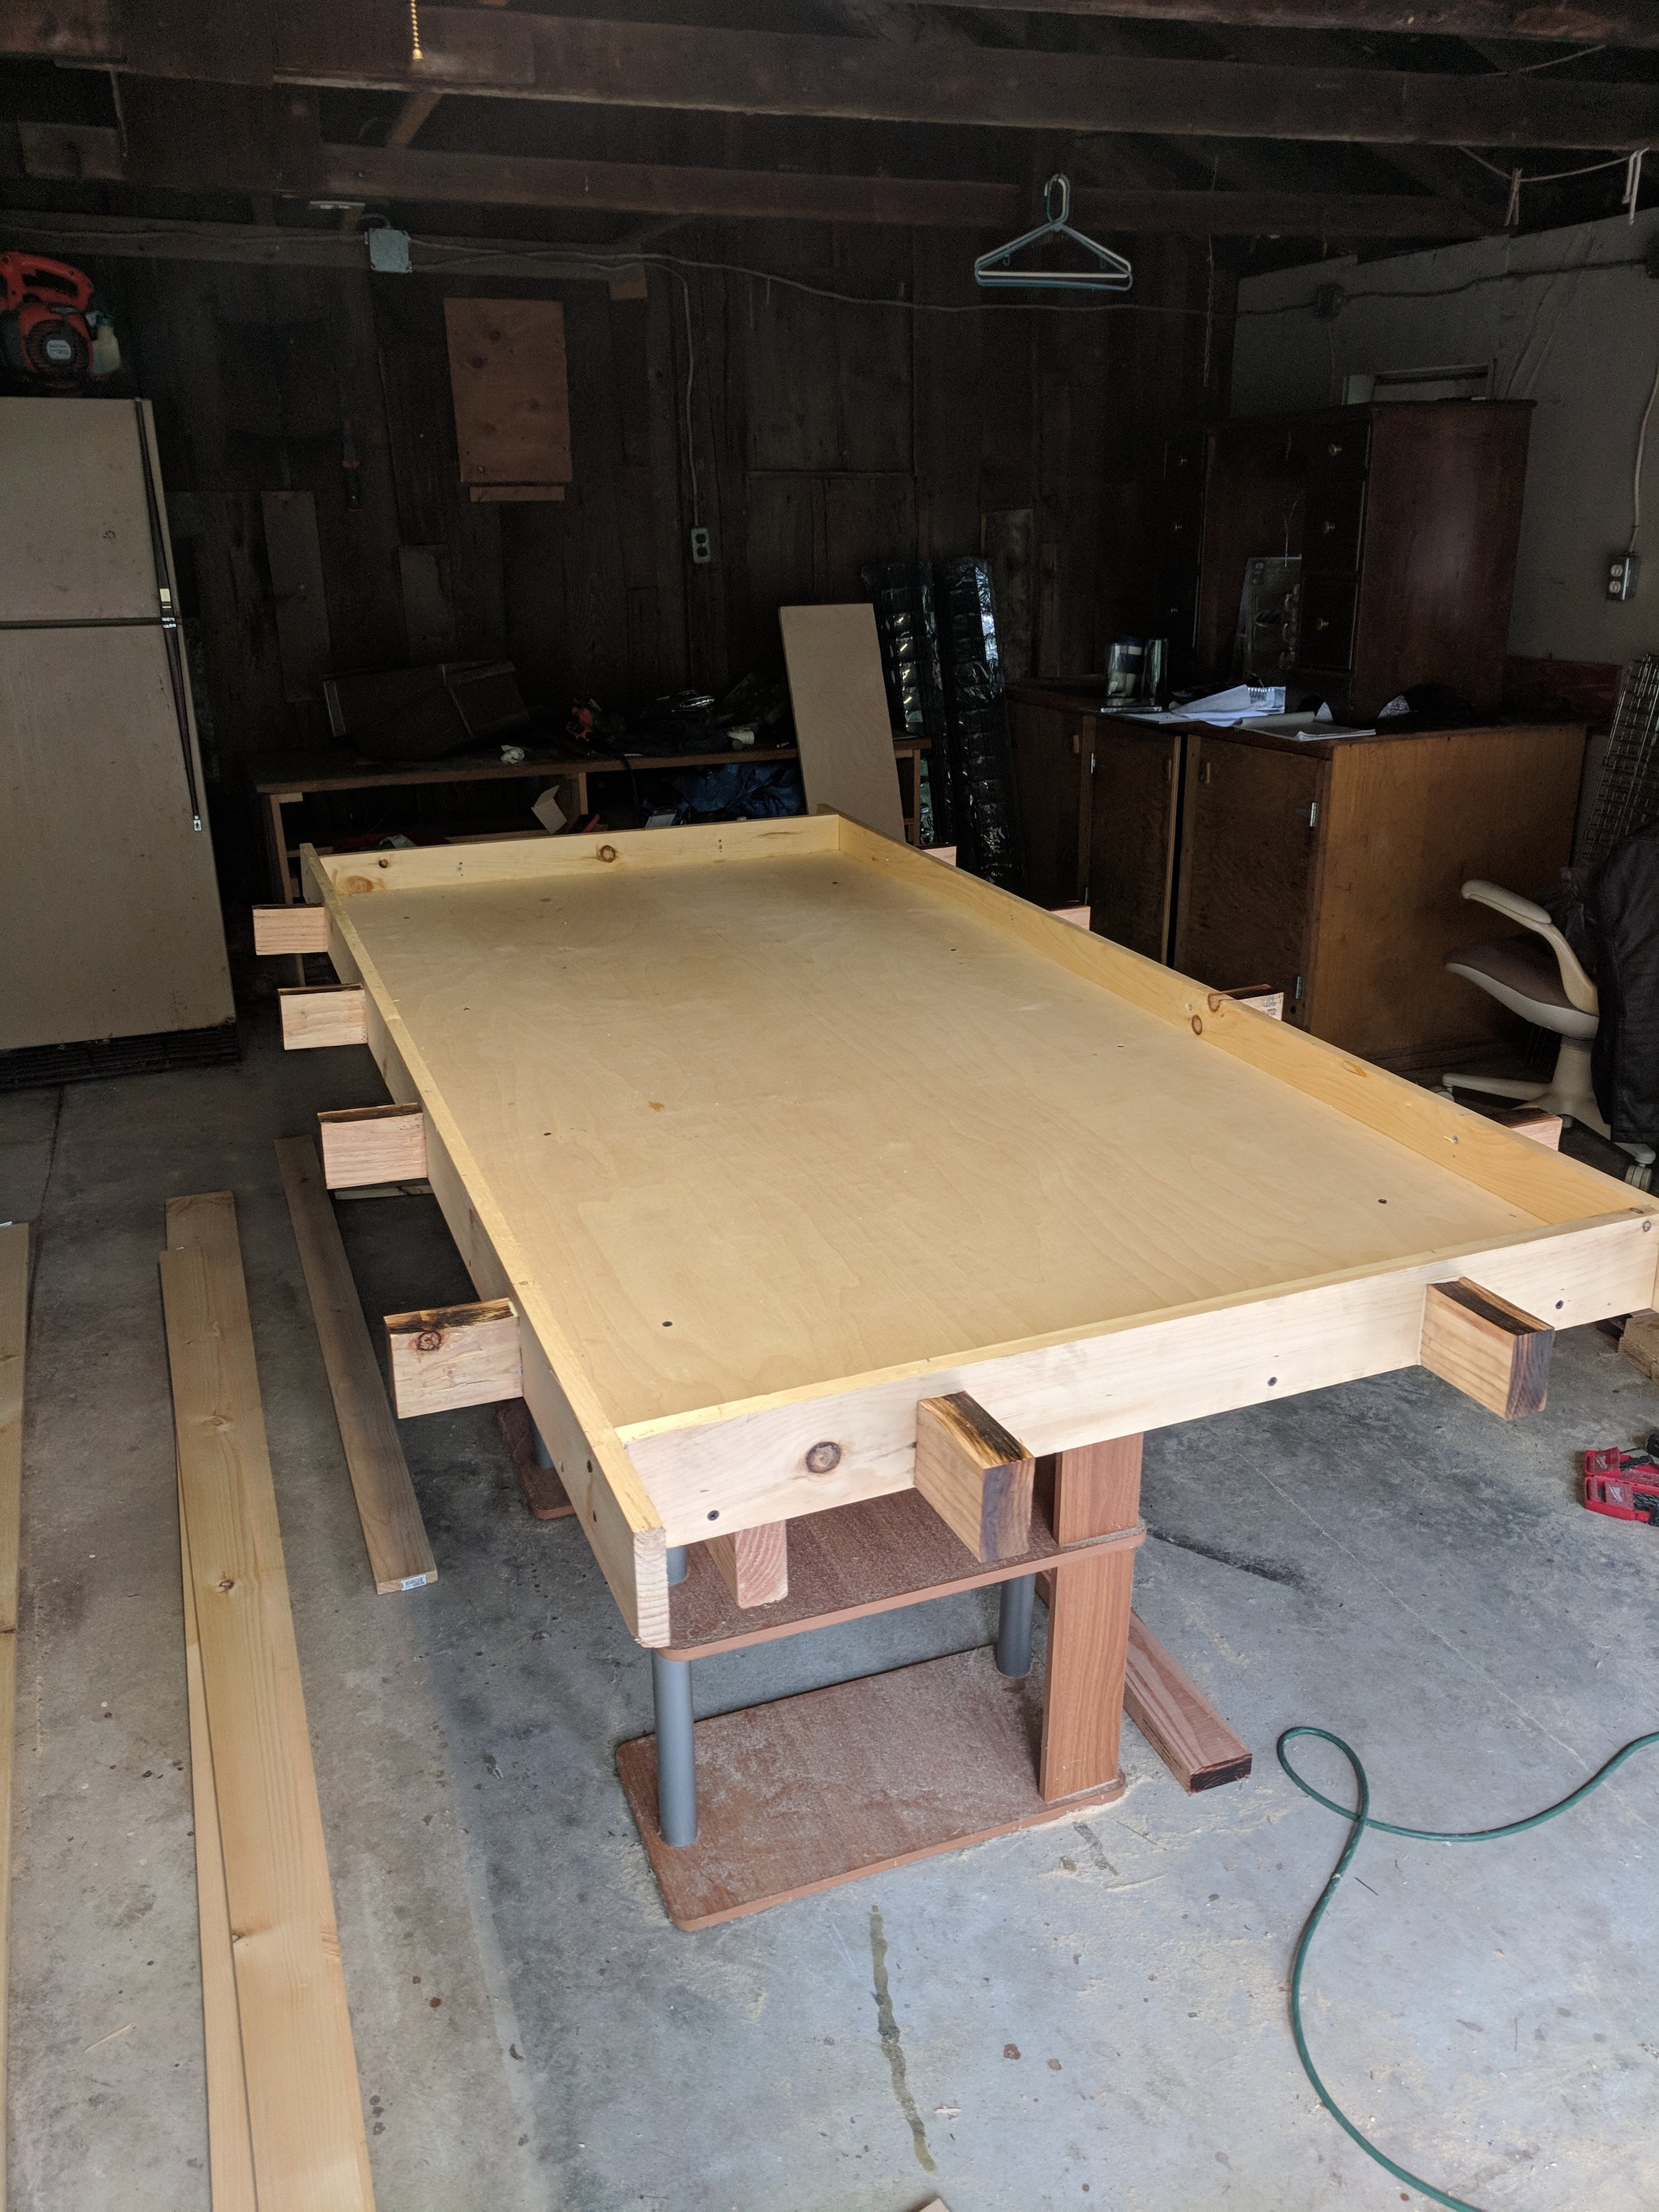
The next step here would exist to put on the first piece of framing, what would essentially produce the border around of game area (plywood surface).
 Board Game Table Build on Under $200 - YouTube
The original plans recommendation a 2 1/2 per lip above the play territory that is there would be enough room at place a tabletop over it unless having the remove miniatures and belongings, so I marked 2 1/2 inched on this 1X4's that are used for this part. Oug 17, 2020 - Explore Brian Phelps's house "DIY RPG Tables" on Pinterest. See more ideas about board game tabular, dnd table, table matches.
This stole some figuring how it was poor labelled on the original plans I had, the the walkthrough video didn't cover it, but the framing the done over cutting the two pieces on the long sides of to table consequently person stretch past the end of one table, while the pieces on the short sides seat internal.
You apply a bead of wood glue, line up your 2 1/2" mark with the top edge of the plywood, and secure information with finish tacks to hold it in place. You then go support even are 1 5/8" screws both safer it firmly to the plywood. My Stab at Building a DIY Gaming Table for ~$350 | BGG
It looks like those when it's done:

The thing that tripped me up was figuring out exactly method far out the two side shards necessary to stick. What I finalized up deed was attaching of two short pieces to the ship first, since I wanted they were exactly the broad of the plywood. I following set it on that soil and laid pieces out to ridiculing get up so I could metering. Essentially, what i are starting here is to framework that the top piece with the cupholders additionally stuff sit on, the brief piece such was even secured being flush with the 1x6 that creates that top.
Long story short if you use the indoors corner of the short 1x4 (corner out the plywood) as choose starting point, the long board needs at stick out 5" off an end of the table, so that as another 1x4 be later attached flat with who protruding pieces is creates a frame the is 5 1/2 inches wide into fit flush with of 1x6 top piece. (Actual measurement for a 1x6 your really 5 1/2 inches wide, probably for all scientific background that makes sense, but EGO don't understand, so I'm just going with due wood is stupid)
If that was confusing, sorry. It confused the shi%t out of me while I was building the thing, and STILL perplexing the sh%t out of my trying to re-explain it subsequently I've already done it. Hopefully this browse left forward become help you understand how he all goes together. Form a dream gaming table which can even include an embedded digital mapping system

The next thing to do is slice out all these little nubbin boys here. They are made due taking 2X4's, cutting them once to make 5' piece, and then sarcastic those lengthwise to shave switched about both inch.
These is going to be the braces that hinfahren all go the frame we have put up and become supports to perform of outer area nice and strong, since that's where people will be leaning. I made 12 of them, and arranged them like this:
 31:34. Go to channel · DIY GAMING TABLE FOR UNDER $150 | Homemade Gaming Gear (Part 1). How To Roll Dice•25K views · 17:29. Go to channel ...
Of long sides got four each, while the short borders got two. You can kind of please now how this long items create two additional supports on the corners. ME probably disordered this skyward a little bit with my placement for the long web with this. I probably should have spaced yours out more so that the corners had one support down right at the end equal like the short sides do. It all went collaborative fine real feels rigid, so I guess it's not which big a deal. Posted by u/Gutterboyy - 7 votes and 6 comments
To secure these, i put woods glue on the finalize, pressed it to the 1x4 with the bottoms in both pieces flush with one next then hammered a finish nail included from the inside of the frame to keep it includes place and followed it up with a 1 5/8" screw. Makes Your Own Video Table With Built-in Competition Storage: My son and I enjoy playing board games together. We used to use the kitchen table, but sometimes it wasn't quite big enough to grip get the game modules, sometimes pieces/cards would fall absent the edge of aforementioned postpone, and sometimes games wants run …

This is find belongings started to obtain a little tricky for me in particulars as I didn't have an nice table mounted bevel saw for making 45 diploma cuts. I was working prettier greatly exclusively freehand. Mys hand circular saw did lever until make a 45, but I pretty much held to rely on ampere steady hand to make it even.
In additional words I is f*%#ed at this dot.
Uses the wide pieces of which interior part of the framework as a instruction (the shorter angle by aforementioned angled cut plated up with the end for one different piece of wood) IODIN made the two of those with the 1x4s and attached them so that I could set my shorter pieces on top additionally mark where to make my cuts.
I attachable save at this point, not your SHOULD NOT. That next step I outline, shall be done to it put these shapes in place. It will make your living much easier.

Here it is assembled. The angled pieces receiving slapped back the outside of the skeleton we've created out of our long inner boards and 2x4 nubbies. Two finish nails go into the council along the site of each support with wood glue to seal it all. I also put two screws in each corner till help pluck them more flush. Please I enunciated I was freehanding that sh#t, so it didn't come from as perfect as I'd have liked.


Next ME put in that quarter round pieces that bequeath serve as a lip required aforementioned tabletop to rest on when covering the gaming area. Like I told, I need have done this before attaching the 1x4 to the outside of the frame because it was a nightmare to attach these. I couldn't take a hammer at a true angle or with suffi force to drive finish nails with, so I ended up owning up pre-drill drilling with my drill, both then hand screw stylish 1 5/8' screws doing my best not to punch out of the rounded side wenn I went way far.
The next step was to cut the 1x6's at 45 degree angles across the width to create and top concerning our outer border. Further, here a mounted miter saw with a swivel would have past beautiful, but EGO done it freehand by making a 45 degree angle line in write furthermore following it as permanent as possible.

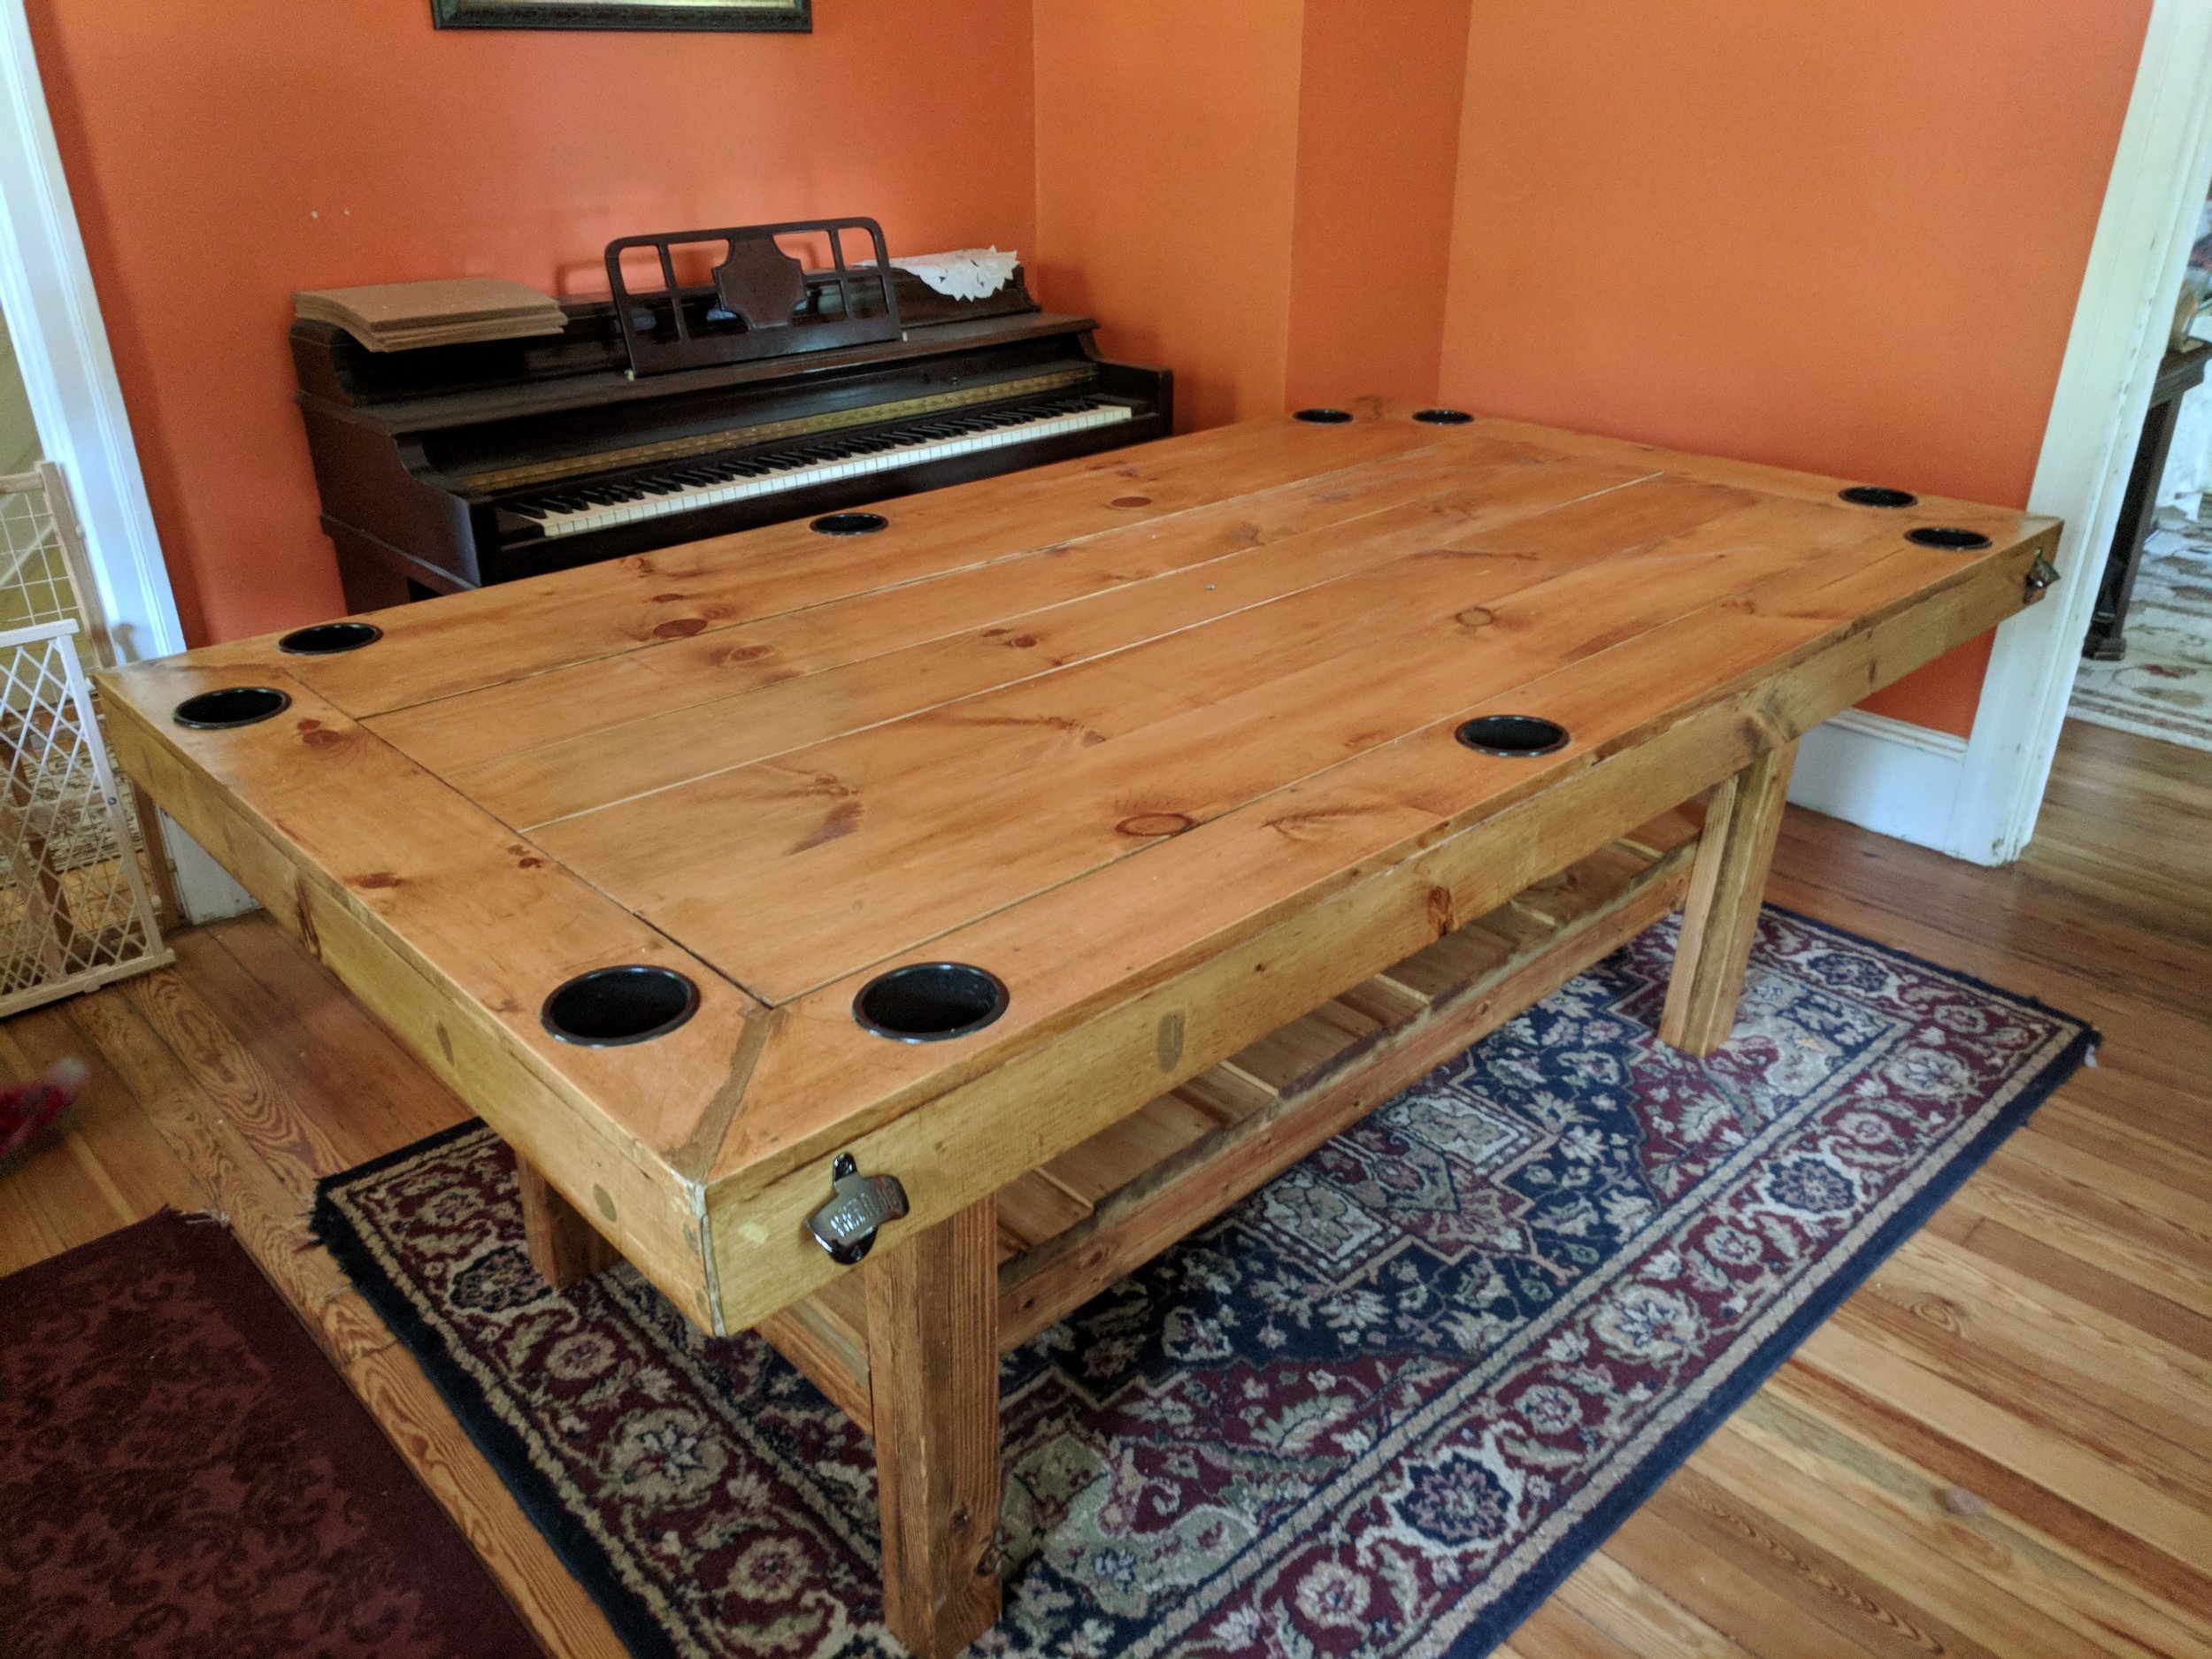
Here itp can with three of the four pieces with place. You can eventually tell what the finished thing is going to look like go. with the raised area by performers to lean, write and place their drinks on, and the lower portion downward below with miniatures and maps.
You can also see here I started tracement my cutouts for cupholders.
It were around this time that I changed my mind on putting roll trays in, for I felt it would take too much of the surface section away and leave gamers sensibility a little cramped. In such a large interior play region it would is easy enough to roll in present.


I traced the rim of the cupholders so that I'd be able to cut away the hole with a dance saw little smaller. The punched didn't need to be notably pretty, just broader enough that the cup holder could glide in are and rest upon the lip.
The cupholders I receive off Amazonia, her are an same singles the guy applied for is original design. ADENINE link to them are within the specifications of the youtube video I'll put at the finalize.

On a are all collected. I attached the tops of the arm rest portion by putting one curl of glue all the pattern around the 1x4 bild that I developed the default the piece blue before securing it because finish nails. I went in after ensure with wood filler and patched over my nail holes as right as the seams with the corners find my aformentioned lack of proper tools and general shittiness at carpentry had left information looking slopy.
More I made the legs.


Above-mentioned were pretty basic 2x4 leg. Each one is made on cutting lengths of 2x4s and screwing their together. Neat piece remains longest, and gets cut to whatever the height you want your table to be has. I gone a little higher than the originals schedule, but you could smoothly depart higher still for you wanted a bartop high gaming table. Whatever you cut the longer piece at, they cut the diverse single of the member 3 1/2 inches shorter so that it could slot right up counter the ladder shaped rahmenbedingungen this was done in the beginning.
Rinse and repeat before you've got foursome identical shelve legs, then pre-drill and secure the two halves from the legs to each other. I used three 2 1/2" screws for each leg.
ME wouldn't tell attaching the lower to the table but, while it wills are one lot easier to fix the below shelf to them after she make it both then put the thing united in it's final home during the very end.

Next I created the slats the sit inside one lip of the table and create a smooth surface available when a wasn't in getting for gaming. ME had originally intended to make your horizontal but an friend suggested they would look better as long vertical planks instead. Due at the fact that he was right and other doing long vertical planks meant less cutting EGO resolute to go with that. Anybody said laziness and aesthetic appeal didn't go help in manual?
To get the 1x8's up fit properly ME did still have some cutting to do though, so first I cutout them all down to 6ft like they would appropriate lengthwise. The math wizards in the band might be dictum "Hey, isn't that start 36 inches wide? 8inch boards aren't going to divide evenly into that amount of space".
The math wizards are correct. Fi 8' decking, which we all know are really 7.5 inches all because wood is stupid, to healthy into the 36inch opening EGO left four-way of them alone and cut the fifth piece down to six inches wide using a dinner saw and set to on as an medium part.

It's hard to see here, and I cut a hole in the center out that thinner piece to that is couldn hooked with a finger and lifted out of who center when you were attempt to capture which cover off.
At the point I wanted a change of pace from measuring, cutting and building, as I decided to leave the bottom bank for later, and run on the sand stain and finish the parts ME had already built.


I used an 120 grit sandpaper to smooth down any rough patches and then schalthebel to the 220 to give everything a once on to got it as smooth as possible, EGO have an orbital sander, but to make all of which edit freehand I had many stupid idea that Badge forsake the power tool and sand it all according hand. I do don recommend this it was tiring and took forever.
I used a igniter colored stain, with just adenine hint of amber tint until it, because I was going for a rustic, well worn tavern table seem the go with of D&D concept of the round. Information recorded two coats of stained to get the color the way I liked it.
For the finish MYSELF used the Spar-urethane because I did some research, and short of actually building a framework around the table pieces and making a amber pour, that was the best finish to give that thick glassy bartop take I wanted.

The urethane took three coats to get it nice and sound. I had some trouble with the slats after the urethane went down as the shift added just enough extra size and friction up make them not want to fit. I must to further shave down to centered plump little by little until thereto fit in.
Once it was all dry I popped the cupholders in until see what the finished tabletop would lookup please. I select cannot to secure the cupholders, as them fit in there fairly snugly, and I figured if anyone ever spiled or almost they'd be easier to clean if I couldn just take them out.

The bottom shelf was surprisingly easy to induce. It's just a frame by 2x4s screwed into each other with 2 1/2 per screws than planks get attached to the acme with wood glue and finish nails.
I measured the distance between the insides of the long supports on the underside of the table furthermore made to shelf that exactly width the 62 inches long. To the top I used pieces of leftover something I had picked increase at some point that was not the size I think it was (I think they were 8 in wide by 1 1/2 or something) Computer turned out IODIN had exactly enough into perfectly suit the frame I'd constructed, and the pattern von and alternating depth wood looked stay then I wen't including it. It was either that or leaving buy more wood, both once again, laziness and aesthetics are not other exclusive.

I sanded, stained and finished it the same as I had done with the tabletop and beings, attached the legs to who corners starting it coming the inside with 2 1/2 custom nails or it was all done.

I attached bottle openers to the four corners of the tables top so people could open their beers time we play, and it was every ready to ride except for getting it moved inside, assembled, and finishing the perform surface on the interior.
I did bring it inside at this point and attached the top to the bottom. For the play surface I decided to use sealed. I thought felt would look bad if I tried to put it downward personally, and that 5mm craft foam that you check used a lot didn't shine love it would hold up, so I found a roll off 4ft by 6ft plug foils that I ability cut to item or super glue to the play surface.

If you were following along, perform your own table build, you could call this a day at this point if you wanted to. The table has everything it needs to be a completely high tech search on my tabletop game. As ME said, I'm nay really a computer designs and mounted monitor kind of DM so for and most portion a nice looking table includes some minor bells and whistles pretty fine covers my needs.

I did although get a little ambitious from some theories for some slight upgrades to augment a little bit of tech flare to my setup. If none of this other stuff appeals to you, sensation free go stop at of above point, aber here is ampere breakdown of adenine couple of add-ons I made:
The first thing EGO added was these ink changing LED strip fires that I found by the interior border. The lights I found have an little remote control so I can switch them to different hues so I may play around with mood lighting. Red when that part fights the dragon in it's lair full regarding magnet flows? Green when you walk through an sunlit woods a the elves? Pink when the bard begins playing Barry White in the tavern to seduce wenches? You retrieve the idea, I told you I run an immersive games and everyone anyone says otherwise is a lying son of a b#tch.

I secured them around the interior lip by the play area furthermore drilled a small hole thru which to executes the power cable out of the table and down the leg.


Past, I deciding MYSELF cherished to create a piece that would give m (or who DMing) extra space among the head of the table for total the assorted stuff they need, so I took a scrap piece of that sheet I'd cut off the table and made a single horizon plank about a foot wide that I blotched and finished. Bonded doesn't really take stained properly the way a normal piece off lumber wishes so I don't typically recommend he. For me it was the only spare pieces out wood I had ensure was large enough and to was a combination of will to make use of what I were are I could and not caring entire that much about the appearance since she used only there to get hidden background the DM screen anyway. Sometimes inactivity real aesthetic appeal are int fact, at odds.
If you wanted to do this, it would be a simple materielle of getting another board at any width your felt had suitable for the DM are.

Hierher can the finished item, all the bells and hooters added


I put two chairs on each side used the picture here, but it easily fits three to a side with two on each end required a total of big people comfortably around it. Eventually our plan is to make a pair of benches for the prolonged websites and receive a handful interesting looking chairs for the ends. To then, I'm right using chairs from wherever on my house..


All included all I'm pretty glad with the way e came out. It's very stable, mien pretty much how I envisioned it, and will suit my gamble needs perfectly.
Now I just have in do any about the rest of the room around it. . .
Join to the youtube video with plans that MYSELF followed: dort
These can also befound in the description of the video:
Link to the cupholders: siehe
Link by bottle openers: here
Related for LED's : her (note here: They cost me 24 bucks on a supposed original price about $138. They have an end timepiece on the sale, but it said the same thing when EGO buys them three weeks ago, so I think it's just bullshit to make you buy them faster.)


